Plumbing

Fix a loose, kicked-in or water-damaged cabinet toe kick

The toe kick is the thin board set back under your base cabinets, where your feet go when you stand at the counter. It often works loose or swells from kicks, mops and splashes. Most of the time you can fix it with a putty knife, a small pry bar, a hammer, a nail set and a tube of construction adhesive. Press along it first: loose but flat means re-nail it, and swollen means find the water first.

Hands holding a loose white toe kick board against the base of kitchen cabinets and tapping it back with a hammer, a nail set and putty knife on the floor
Small finish nails into the cabinet base hold a loose toe kick tight.
Quick answerPress the toe kick every few inches. If it is loose but flat, pry it off over a putty knife, pull the old nails, and glue and nail it back into the base riser with 1-1/4 inch finish nails. Set the heads with a nail set. If the face is peeling, glue it with contact cement. If it is swollen, check for a leak under the sink or dishwasher, then cut a new board using the old one as a pattern.
Worth checking firstBefore you pull anything, look for water. A swollen toe kick near the sink or dishwasher usually means a leak that is still going. Check our guides to a leak under the sink and a dishwasher leaking water first. A new board on top of an active leak will swell again.
Easy1–2 hours, plus overnight for adhesive to set$5–40 for adhesive, nails and toe kick strip
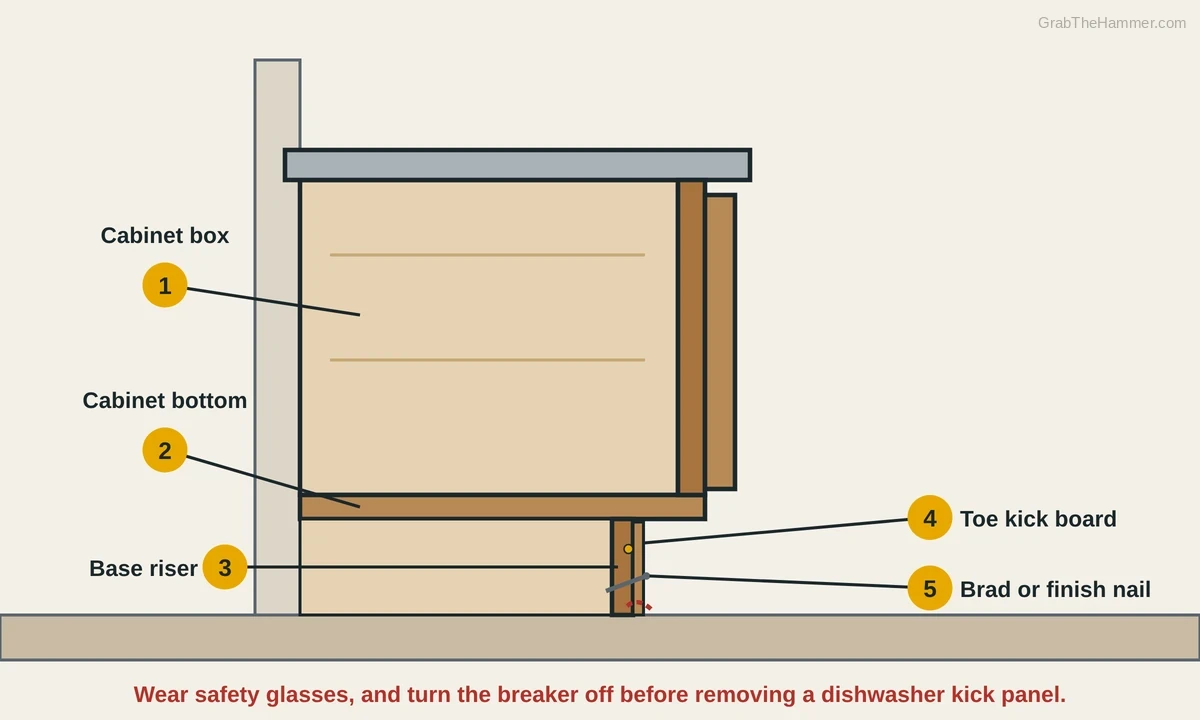
Side cutaway of a kitchen base cabinet against a wall, showing the countertop, the cabinet box, the cabinet bottom, the base riser set back under the front, and a thin toe kick board nailed to the riser with an angled nail, a gold dot of adhesive behind it, and a red dashed swollen spot at the bottom edge near the floor
The cabinet box (1) sits on its bottom panel (2). Under the front, a base riser (3) is set back to make room for your toes. The thin toe kick board (4) is glued and nailed to the riser with brads or finish nails (5). Its bottom edge swells first when water reaches it.

How a toe kick is attached, and why it comes loose

Base cabinets sit on a recessed base, so the front edge of the cabinet hangs over a notch at the floor. That notch is the toe kick. On many cabinets the visible board is a thin skin, often about 1/4 inch thick, glued and nailed onto a sturdier base riser behind it. Either way, the visible board is usually held by a few small nails and a little glue.

Small nails in thin wood don't hold much, and kicks and bumps slowly pull them out. Many toe kicks are made of MDF or particleboard with a wood or vinyl face. When water soaks into the bottom edge, they swell, crumble and lose their grip on nails. That is why a loose toe kick near the sink or dishwasher is often a water problem, not a nail problem.

What usually makes a toe kick loose or damaged

Kicks and bumps

Shoes, vacuums and mops push the thin board in until the nails let go.

Too few or short nails

Some boards were only tacked on with a couple of small brads.

Water from a leak

A dishwasher or sink leak soaks the bottom edge and swells it.

Mopping and spills

Repeated wetting slowly puffs particleboard and lifts the face skin.

Glue that dried out

Old adhesive lets go, and the face veneer starts to peel.

What's happening?
You noticeLikely causeStart at
Not sure how bad it isPress the board and check for swelling or soft spotsStep 1
Loose or fell off, still flatPry it off over a putty knifeStep 2
Old nails or glue in the wayPull nails through the back, scrape the riserStep 3
Face skin peeling or board swollenGlue the skin or cut a new boardStep 4
Board is ready to go backGlue and nail into the base riserStep 5
Holes show, or the area gets wetFill, touch up, or use vinyl baseStep 6
Wear safety glasses, turn the breaker off at the dishwasher, and stop at soft woodWear safety glasses whenever you hammer or pry; nails can spring out. The panel under a dishwasher hides wires and often a junction box, so turn that breaker off before removing it. Contact cement and some construction adhesives give off flammable fumes; open a window and keep flames away. If water is still dripping, close the sink shutoff valves or turn off the dishwasher's water supply first. If the floor or cabinet bottom is soft or smells musty, stop. That points to a long-running leak and possible rot or mold that needs more than a new board.

Let's fix it

0 of 6 done
  1. Check what kind of damage you haveKneel with a flashlight and look along the recess. Press the toe kick board with your fingers every few inches. A sound board is flat and tight. If it just rocks, gaps or has fallen off but is still flat, go to Step 2 and reuse it. If the thin wood skin is peeling but the core is firm, plan on Step 4. If the bottom edge is puffed, soft or crumbly, it got wet. Find the leak first, then replace the board. Push a screwdriver tip into the floor and the cabinet bottom right behind it. If either feels soft or spongy, stop here. That damage goes past the toe kick and needs a pro.
    Something went wrong?
    • The board is wet right now Leave it alone and find the water. Check the dishwasher and the sink trap first, then dry the area with a fan.
    Close-up of the recess under a base cabinet with a flashlight beam on the toe kick board, a finger pressing it, and a red dashed outline marking a swollen, puffy bottom edge near the floor
  2. Pry the toe kick off over a putty knifePut on safety glasses. Slide a stiff putty knife into the seam at the top of the board, near one end. Set a small flat pry bar on top of the putty knife, so the bar presses on steel and not on the cabinet finish. Lever gently until the board moves about 1/8 inch. Then move along to the next nail and repeat. Work slowly so it comes off in one piece. If you see screws, remove them instead of prying. The panel under the dishwasher is a separate part held by screws. Turn the dishwasher's breaker off before you remove that panel, since wires and a junction box often sit behind it.
    Something went wrong?
    • The board splits as you pry Keep going and save the pieces. Tape them together later to trace a new board.
    • The cabinet face gets dented Use a wider putty knife or a thin scrap block under the bar to spread the force.
    Toe kick board being pried away from the cabinet base, with a wide putty knife in the top seam and a small flat pry bar resting on the putty knife, and a yellow arrow showing the board tipping outward
  3. Pull old nails and scrape off old glueGrip each nail with locking pliers or end-cutting nippers and pull it out through the back, rolling the jaws against the wood. That keeps the face from blowing out around the hole. Next, look at the front of the base riser, the board the toe kick nails into. Pull or snap off any nails left in it, and tap the stubs flush with a hammer. Scrape old glue off both surfaces with the putty knife. Check the riser while you are there. If it is loose, damp or crumbly, stop and dry or repair it first, since a new board needs solid wood behind it.
    Toe kick board lying face down on a towel, with locking pliers gripping a finish nail and rolling it out through the back of the board, and a yellow curved arrow showing the rolling motion
  4. Glue down peeling veneer or cut a new boardIf only the face skin is lifting, brush contact cement on the back of the skin and on the core. Work with windows open, since the fumes are flammable; keep flames and pilot lights away. Wait until it feels dry to the touch, then line up the skin carefully before it touches, since contact cement grabs at once and can't be shifted. Press it down and roll or tap it flat with a scrap block. If the board is swollen or crumbly, replace it. Buy matching prefinished toe kick strip from your cabinet maker or a home center, or cut one from 1/4 inch plywood. Lay the old board on the new stock and trace it, including any notches for pipes or the floor. Cut it slightly long, test the fit, then trim to size.
    Something went wrong?
    • The new board is too tall to slide in The floor may dip. Trace the floor line onto the board and plane or sand to it.
    Old swollen toe kick board laid on top of a new strip of thin plywood, with a pencil tracing its outline and a notch, and a green check beside the clean new piece
  5. Glue and nail the board into the base riserRun a thin bead of construction adhesive along the back of the board, about 1 inch from the top and bottom edges. Press the board into place. Start 1-1/4 inch brads or finish nails into the base riser, two at each spot where the riser or a cabinet side sits behind the board, one near the top and one near the bottom. Angle each nail slightly down so it bites into the riser. Swing the hammer with short, controlled taps. Stop when the head is about 1/8 inch above the board, then finish with a nail set so the hammer face never hits the wood. If the nail bends or hits nothing solid, pull it and move over 1 inch.
    Something went wrong?
    • The hammer keeps hitting the countertop or cabinet face Choke up on a lighter hammer, or use a nail set for the last few taps.
    • The board springs back out Add a nail near the end, or hold it with a scrap and weight while the glue sets.
    Close-up of a new toe kick board pressed against the base riser under a cabinet, with a hammer tapping a finish nail angled slightly down, a nail set beside it, and a yellow arrow showing the short tapping motion
  6. Finish the board and protect it from waterFill the nail holes with wood filler or a matching color putty stick, and wipe off the extra. Touch up the edges of a new board with stain, paint or the cabinet maker's touch-up marker. If you removed the dishwasher kick panel, set it back, drive its screws snug, and only then turn the breaker back on. For a sink base or a spot that gets mopped often, consider vinyl wall base instead of wood. It is a flexible strip, often 2-1/2 or 4 inches tall (pick one no taller than your toe kick), that sticks on with cove base adhesive and shrugs off water. Let adhesive set overnight before you mop.
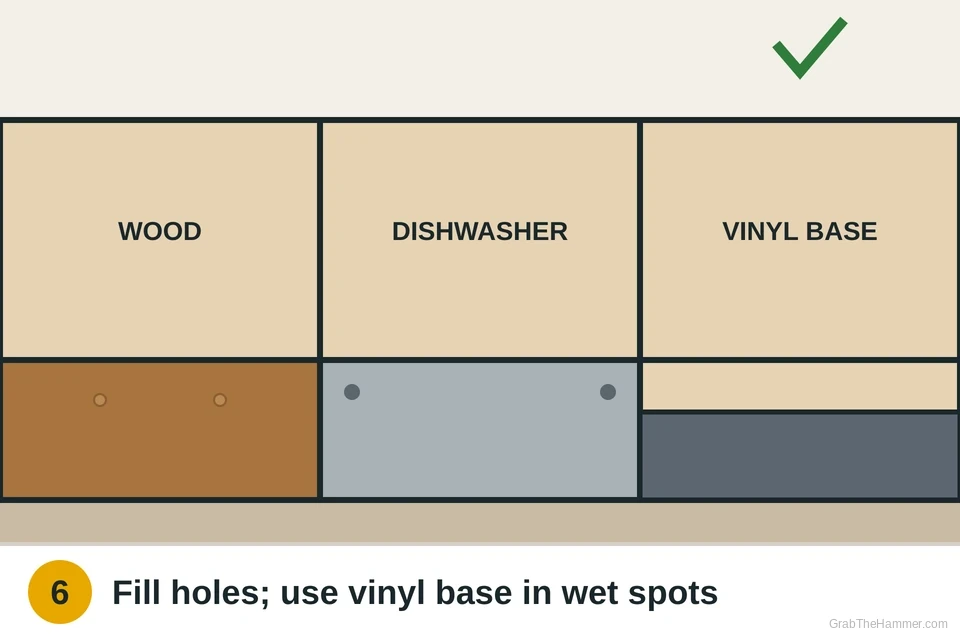
    Finished toe kick under a cabinet with filled nail holes, a dishwasher kick panel screwed back on beside it, and a strip of dark vinyl wall base on a sink cabinet section, with a green check mark

Watch it done

How to Fix a Cabinet Toe Kick | Easy DIY Cabinet RepairBy Built By Louis on YouTube. Their method may vary a little from ours.
Watch on YouTube
How you'll know it's fixed
  • The board sits flat and tight and doesn't move when you push it with your foot
  • Nail heads are below the surface and filled
  • The edges line up with the cabinet faces on each side
  • The floor and cabinet bottom behind it are dry and firm

Board still loose at one end? Add one more nail into the riser there, or hold it with a weight while the glue sets overnight.

If it comes back

If the board loosens again, the nails may be missing the riser. Pull it, find the riser with a thin finish nail as a probe, and nail into solid wood. Our hammer guide covers short, controlled taps and using a nail set without denting the finish.

If the new board swells again, water is still getting to it. Recheck the trap and supply lines with our guide to a leak under the sink, and the door seal and hoses with a dishwasher leaking water. Vinyl base in that spot can also help.

If the cabinet doors or hardware are loose too, fix them while your tools are out. See fixing a loose cabinet knob and fixing a crooked cabinet door.

Save the old board as a patternEven a split or swollen board shows the exact length, height and pipe notches. Tape the pieces together and trace them onto the new stock.
Renting?In a rental, the cabinets belong to the landlord. Pushing a loose board back and tapping in a raised nail is usually fine. Report a swollen toe kick, any water under the sink or dishwasher, and any soft or musty spots, since those point to a leak the owner needs to fix.
Call a handyman or cabinet installer ifThe cabinet bottom or floor is soft, there is mold or a musty smell, the base riser itself is rotted, or the toe kick runs under a dishwasher you would need to pull out. Stop if wood crumbles when you pry; that needs more than a new board.Fix it yourself or call? Compare the cost →

What a pro typically charges (a rough estimate; prices vary by area): A handyman typically charges about $75–$200 to reattach or replace a toe kick, plus materials. Leak repair, rot or cabinet base repair costs more.

Find a handyman near you

Something else going on?

Cabinet toe kick questions

How do you reattach a toe kick to a cabinet?

Pry it off over a putty knife, pull the old nails and scrape off old glue. Run a thin bead of construction adhesive on the back, press it on, and nail it into the base riser with small finish nails or brads.

What size is a cabinet toe kick?

A common toe kick recess is about 4 inches high and 3 inches deep. Cabinet lines vary, so measure yours in a few spots and cut to the smallest height.

What is toe kick material made of?

Often MDF, particleboard or plywood with a wood, paint or vinyl face. Many cabinet makers sell matching prefinished toe kick strip, or you can use 1/4 inch plywood.

Can you replace a toe kick that got wet?

Yes. Find and fix the leak first, let the area dry, then cut a new board using the old one as a pattern. Check that the cabinet bottom and floor are firm before you nail it on.

How do you remove the kick plate under a dishwasher?

It is usually held by two or more screws along the bottom. Turn the dishwasher's breaker off first, since wiring often sits behind it, then remove the screws and lift it off.

Reader reports

Did this fix work for you?

Tell the next person how it went. Your numbers are added to the totals anonymously; tips are read by our team before they appear.

How did it go?
Reader Q&A

Questions from readers

No questions on this guide yet. If you're stuck, ask below. Useful questions and answers get added here for the next person.

Ask a question

We read every question before anything is published, and we never show names or emails. Please leave out personal details. PrivacyAccessibility

About the authors

GrabTheHammer Team

  • No sponsored picks
  • Safety first
  • Tells you when to call a pro

We're a small team of writers and editors who check every guide against manufacturer instructions and common code requirements. Our goal is to help you understand the problem, tackle what you safely can and know when to call a pro.

Checked against: Hunker, How to install toe-kick boards for kitchen cabinets (hunker.com); Timberlake (MasterBrand), Vanity cabinet toe kick treatment install guide (timberlake.com); dishwasher owner's manuals on disconnecting power before service.

How we write and review →
A helpful next stepFind and fix a leak under the sinkRule out a slow leak under the sink so the new board stays dry.