What is this tool? A picture guide to home repair tools
Found a tool in a drawer and not sure what it is? Or a guide says "grab tongue-and-groove pliers" and you want to know what those look like? Each tool below has a labeled drawing, what it is for, how to tell it from look-alikes, and the guides that use it.
- 34 tools with labeled drawings
- How to tell look-alikes apart
- Links to the guides that use each one
See the 8 basic tools to buy first →What can I fix with my tools? →
Updated November 2026 · Every diagram is drawn by us and checked against the real tool
I need to…
Pick a job to see which tool to grab, which look-alike to skip, and the guide that walks you through it.
Tighten a faucet nut up behind the sink
Grab this:

Not this one: Adjustable wrench
There is rarely room to swing a regular wrench back there.
Step-by-step guideKitchen faucet loose at the base →Loosen a plastic drain nut under the sink
Grab this:

Not this one: Pipe wrench
A pipe wrench is too heavy and its teeth can crack plastic nuts.
Step-by-step guideFind and fix a leak under the sink →Tighten a water supply line nut
Grab this:

Not this one: Pipe wrench
Snug it, then stop. Overtightening can crack the fitting.
Step-by-step guideFind and fix a leak under the sink →Turn a steel pipe or a big threaded fitting
Grab this:

Not this one: Adjustable wrench
Hold the pipe behind it with a second wrench so you don't twist the line inside the wall.
Step-by-step guideShower diverter not working →Find a stud in the wall
Grab this:
Step-by-step guideHow to find a wall stud (with or without a stud finder) →
Hang a curtain rod or shelf level
Grab this:
Step-by-step guideFix a curtain rod that pulled out of the wall →


Check if a wire is live
Grab this:

Test the tester on a live outlet before and after.
Step-by-step guideReplace a light switch safely →Strip wire to connect an outlet or switch
Grab this:


Not this one: Utility knife
A knife can nick the copper, and a nicked wire can break later.
Step-by-step guideReplace an electrical outlet →
Unclog a toilet
Grab this:


Use a flange plunger. A flat cup plunger won't seal in a toilet.
Step-by-step guideUnclog a toilet (without the overflow) →Unclog a sink
Grab this:
A flat cup plunger seals best on a sink drain.
Step-by-step guideUnclog a sink without chemicals →

Drive or remove screws
Grab this:


Match the tip to the screw head so it doesn't strip.
Step-by-step guideFix a sagging closet shelf →Tighten a loose faucet handle
Grab this:

Many handles hide the screw under a small cap.
Step-by-step guideStop a dripping faucet →Free a jammed garbage disposal
Grab this:
Unplug it or switch off its breaker first.
Step-by-step guideUnjam a garbage disposal →Fill nail holes in trim or walls
Grab this:
Step-by-step guideFill nail holes in trim before painting →
Tap laminate planks together
Grab this:

Not this one: Claw hammer
A steel hammer dents the plank edge.
Step-by-step guideClose gaps in a laminate or vinyl plank floor →Make a flush cut in trim or flooring
Grab this:
Step-by-step guideFix a loose floor transition strip →
Sink a finish nail below the surface
Grab this:

Then fill the hole with wood filler.
Step-by-step guideFill nail holes in trim before painting →Pry off trim or baseboard
Grab this:

Put the putty knife behind the bar to protect the wall.
Step-by-step guideFix loose door trim →Test an appliance part for continuity
Grab this:

Not this one: Non-contact voltage tester
Unplug the appliance first.
Step-by-step guideDryer not heating →Cut flashing or sheet metal
Grab this:

Not this one: Utility knife
Wear gloves; cut edges are sharp.
Step-by-step guideGutter leaking at the seams →

No tool matches that. Try a shorter word, like "wrench" or "saw", or search all guides.
Measuring & marking
Most fixes start with a measurement. These tools tell you how long, how level, how square and where the framing is behind the wall.
Tape measure
Also called: measuring tape, tape rule


- 1Case
- 2Blade
- 3End hook
- 4Blade lock
- 5Belt clip
What it is for. A steel tape that pulls out of a case and locks in place. Use it to measure rooms, parts, openings and where to drill.
More about this tool
Common uses. Measuring rooms, doors, windows, furniture and parts before you buy.
How to tell it apart. The metal hook on the end is loose on purpose. It slides about the thickness of the hook so inside and outside measurements both read true. Don't confuse it with a soft cloth tape for sewing, which stretches and has no lock.
One useful thing to knowFor an inside measurement, like a window opening, add the case length. Many cases have their length printed on the side, so you can read the blade at the case and add it.
More about this tool
Used in these guides: Fix a curtain rod that pulled out of the wall, Closet door off track, Fix a wobbly ceiling fan, Drawer won't close all the way
Level
Also called: spirit level, bubble level, torpedo level


- 1Frame
- 2Level vial
- 3Bubble
- 4Plumb vial
- 5Hand hole
- 6Measuring edge
What it is for. A straight bar with small vials of liquid. When the bubble sits between the lines, the surface is level or plumb.
More about this tool
Common uses. Hanging shelves, pictures and curtain rods, and checking appliances and door frames.
How to tell it apart. The vial along the length reads level. The vial set across it reads plumb, for upright things like door frames. A short 9 inch torpedo level fits in tight spots. A laser level is a different tool that projects a line on the wall.
One useful thing to knowCheck a level by reading it, flipping it end for end on the same spot, and reading again. If the bubble moves, the level is off.
More about this tool
Used in these guides: Fix a curtain rod that pulled out of the wall, Fix a sagging closet shelf, Fix a loose towel bar, Dishwasher leaking water
Stud finder
Also called: stud sensor, wall scanner


- 1Marking notch
- 2Display
- 3Scan button
- 4Grip
- 5Flat sensing face

What it is for. A handheld sensor you slide across a wall to find the wood or metal studs behind the drywall. Heavy things like shelves and TV mounts need to go into a stud.
More about this tool
Common uses. Finding studs before you hang shelves, TV mounts, grab bars or heavy mirrors.
How to tell it apart. Most are electronic, with a screen or lights and a notch at the top to mark the stud edge. Hold it flat on the wall before you press the button so it can set itself. A small magnet that sticks to drywall screws does the same job a slower way.
One useful thing to knowScan from both directions and mark both edges. The stud center is halfway between, and a mark from one side alone can be off by half an inch or more.
More about this tool
Used in these guides: How to find a wall stud (with or without a stud finder), Fix a curtain rod that pulled out of the wall, Fix nail pops in drywall, Fix a loose towel bar
Speed square
Also called: rafter square, triangle square


- 1Fence (lip)
- 2Pivot point
- 3Degree scale
- 4Inch ruler
What it is for. A metal or plastic right triangle with a raised lip on one edge. Hold the lip against a board to mark a straight 90 or 45 degree line.
More about this tool
Common uses. Marking square cuts on boards and trim, marking 45 degree cuts, and checking that a corner is square.
How to tell it apart. The raised lip (the fence) along one edge is what makes it a speed square. The long edge has a degree scale from 0 to 90. A framing square is a flat steel L with two long arms and no lip.
One useful thing to knowTo mark an angle, keep the pivot point corner on the board edge and turn the square until the degree mark you want lines up with that same edge.
More about this tool
Used in these guides: Cut a board square with a speed square
Hammers & striking
A hammer drives and pulls nails. A mallet taps parts into place without leaving dents.
Claw hammer
Also called: hammer, curved claw hammer, finish hammer


- 1Face
- 2Neck
- 3Cheek
- 4Claw
- 5Handle
- 6Grip
What it is for. A steel head on a handle, with a flat face for driving nails and a split claw for pulling them out. A 16 oz hammer suits most jobs around the house.
More about this tool
Common uses. Driving and pulling nails, hanging pictures, and light demolition.
How to tell it apart. The claw curves down toward the handle. A framing hammer is heavier, with a straighter claw and often a textured face that leaves marks. A ball-peen hammer has a round knob instead of a claw and is for metalwork.
One useful thing to knowWhen pulling a long nail, slip a scrap of wood under the head. It protects the surface and gives you more leverage.
More about this tool
Used in these guides: How to use a hammer (without bending nails), Hang a picture on drywall with a hammer and nail hooks, Fix popped deck nails that keep working up, Fix a loose stair baluster that rattles or spins
Rubber mallet
Also called: mallet, soft mallet


- 1Rubber head
- 2Striking face
- 3Handle
What it is for. A hammer with a solid rubber head. It taps parts together without denting wood, flooring or metal.
More about this tool
Common uses. Tapping flooring together, knocking furniture joints apart or back in, and setting pavers.
How to tell it apart. The head is round and much bigger than a hammer head, with no claw. Black rubber can leave scuffs on light surfaces, so a white or gray head is the safer pick for flooring. A dead blow hammer looks similar but has a hollow head filled with shot, so it doesn't bounce.
One useful thing to knowTap with a block of wood between the mallet and a flooring plank's edge. Hitting the tongue directly can crush it so the next plank won't lock.
More about this tool
Used in these guides: Close gaps in a laminate or vinyl plank floor, Fix a wobbly wooden chair, Fix a loose floor transition strip, Install quarter round or shoe molding
Pry bar
Also called: flat bar, flat pry bar, wonder bar


- 1Curved end
- 2Flat end
- 3Nail notch
- 4Nail-pulling hole
What it is for. A flat steel bar with a curved end and a flat end, both notched for nails. It pries off trim, baseboard and molding.
More about this tool
Common uses. Removing baseboard and door trim, lifting a floor transition strip, and pulling nails.
How to tell it apart. It is flat and thin, unlike a round crowbar. Both ends have a V-shaped notch for nail heads, and most have a nail-pulling hole in the middle.
One useful thing to knowSlip a putty knife or a thin scrap of wood behind the bar so it doesn't dent the wall.
More about this tool
Used in these guides: Fix loose door trim, Fix a loose floor transition strip, Fix a loose, kicked-in or water-damaged cabinet toe kick, Fix a gap in a trim corner
Nail set
Also called: nail punch


- 1Striking head
- 2Knurled grip
- 3Tapered shank
- 4Cupped tip
- 5Tip seen end-on

What it is for. A short steel punch with a small cupped tip. Tap it with a hammer to sink a finish nail just below the surface so you can fill the hole.
More about this tool
Common uses. Setting finish nails in trim, baseboard and flooring, and resetting nails that have popped up.
How to tell it apart. It looks like a thick nail with a knurled grip and a flat head. The tip is cupped so it sits on the nail head without sliding off. Sets come in a few tip sizes.
One useful thing to knowUse a tip a little smaller than the nail head. A tip that is too big leaves a ring-shaped dent around the hole.
More about this tool
Used in these guides: Fill nail holes in trim before painting, Fix loose door trim, Fix nail pops in drywall, Fix a loose or raised hardwood floorboard
Screwdrivers & bits
Match the tip to the screw head. The wrong tip slips and chews up the screw.
Phillips screwdriver
Also called: cross-head screwdriver, Phillips head


- 1Handle
- 2Shank
- 3Phillips tip
- 4Tip seen end-on

What it is for. A screwdriver with a pointed, cross-shaped tip. It fits the X-shaped screw heads on switch plates, cabinet hinges and appliance panels.
More about this tool
Common uses. Switch plates, cabinet hinges, door hardware, appliance panels and battery covers.
How to tell it apart. Sizes run #0 to #4. A #2 fits most screws around the house. A Pozidriv tip looks close but has small extra lines between the arms, and a Phillips tip in a Pozidriv screw tends to slip.
One useful thing to knowPush in firmly while you turn. Phillips tips are shaped to slip out under heavy turning force, so a light grip strips the screw head.
More about this tool
Used in these guides: Closet door off track, Blinds won't go down or stay up, Door rattles when closed, Casement window crank not working
Often confused with: Flathead screwdriver (compare →)
Flathead screwdriver
Also called: slotted screwdriver, flat screwdriver, flat-blade screwdriver


- 1Handle
- 2Shank
- 3Flat blade
- 4Tip seen end-on

What it is for. A screwdriver with a single flat blade for screws with one straight slot. It also fits radiator bleed valves and many outlet cover screws.
More about this tool
Common uses. Slotted screws, radiator bleed valves, and some outlet and switch cover screws.
How to tell it apart. Pick a blade about as wide as the slot. Too narrow and it twists out. Too wide and it scrapes the surface around the screw. The tip flares out slightly from the shank.
One useful thing to knowDon't use it as a pry bar or chisel. A bent or chipped tip slips out of slots and damages the screw.
More about this tool
Used in these guides: Bleed a radiator, Christmas lights half out or not working, Door swings open or closed on its own, Bathtub stopper not working
Often confused with: Phillips screwdriver (compare →)
Wrenches
Wrenches turn nuts, bolts and pipe. Pick the one that grips the shape you are turning.
Adjustable wrench
Also called: crescent wrench, adjustable spanner


- 1Fixed jaw
- 2Movable jaw
- 3Worm screw
- 4Handle
- 5Hang hole

What it is for. A wrench with one fixed jaw and one jaw that slides when you roll a small screw. One tool fits many sizes of nuts and bolts.
More about this tool
Common uses. Supply line nuts, faucet nuts, bolts on furniture and appliance feet.
How to tell it apart. The jaws are smooth and flat, made for six-sided nuts. Roll the jaws snug before you turn so they don't round off the corners. A pipe wrench has teeth and is for round pipe instead.
One useful thing to knowRoll the jaws snug again after every few turns. A loose jaw rounds the corners off the nut.
More about this tool
Used in these guides: Stop a dripping faucet, Fix a leaking garden hose, Dishwasher not filling with water, Dryer making loud noise
Often confused with: Pipe wrench (compare →)
Pipe wrench
Also called: Stillson wrench, plumber's wrench


- 1Hook jaw
- 2Heel jaw
- 3Teeth
- 4Adjusting nut
- 5Handle
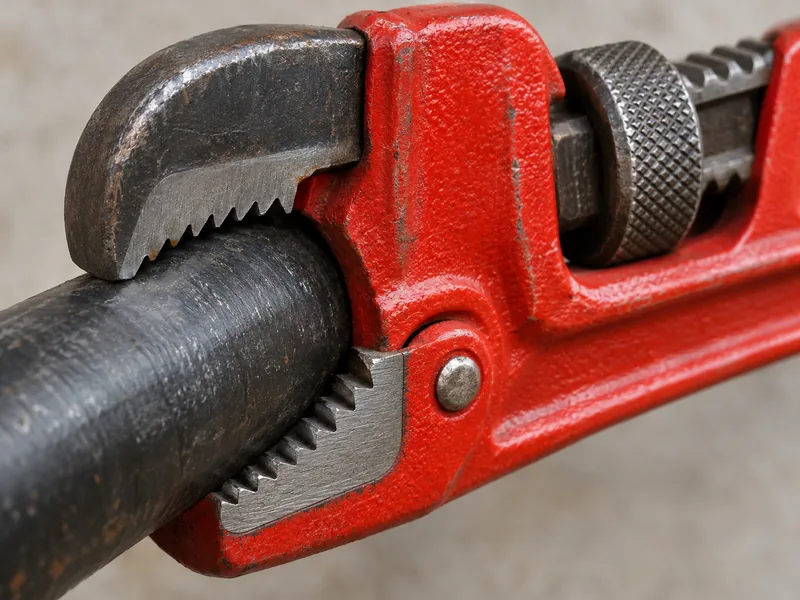
What it is for. A heavy wrench with toothed jaws that bite into round pipe and fittings. The harder you pull, the tighter it grips.
More about this tool
Common uses. Turning steel and iron pipe and large fittings, often with a second wrench holding the pipe.
How to tell it apart. The top hook jaw sits a little loose on purpose, so the jaws can rock and bite. The teeth scar chrome and soft metal, so wrap a rag around finished parts or use a different tool. Tongue-and-groove pliers do a lot of the same work in a smaller size.
One useful thing to knowIt only grips in one direction. If it slips when you pull, flip the wrench over.
More about this tool
Used in these guides: Shower diverter not working
Often confused with: Adjustable wrench (compare →)
Hex keys
Also called: hex key, Allen wrench, Allen key


- 1Long arm
- 2Short arm
- 3Ball end
- 4Hex end seen end-on

What it is for. Small L-shaped bars with six-sided ends. They turn the set screws in faucet handles, door levers, furniture and the bottom of a garbage disposal.
More about this tool
Common uses. Faucet handle set screws, furniture, door levers, and freeing a jammed garbage disposal.
How to tell it apart. They come in inch and metric sets, and the two don't swap well. A ball end on the long arm lets you turn at an angle. Use the short arm in the screw for more turning force.
One useful thing to knowPush the key all the way into the socket before you turn. A half-seated key rounds out the socket.
More about this tool
Used in these guides: Stop a dripping faucet, Unjam a garbage disposal, Casement window crank not working, Clean clogged dishwasher spray arms
Combination wrench
Also called: combo wrench, box-end wrench, open-end wrench, spanner


- 1Open end
- 2Box end
- 3Shaft
- 4Size stamp
- 512-point ring
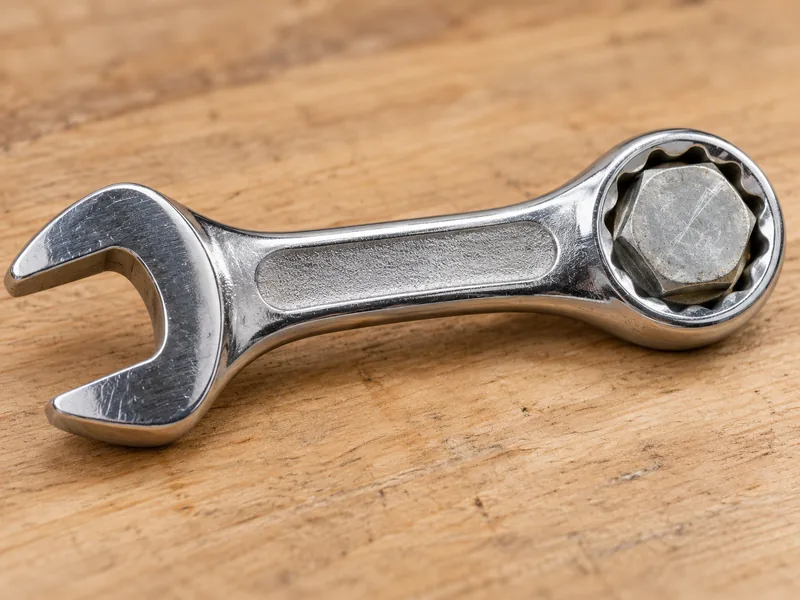
What it is for. A fixed-size wrench with an open U-shaped jaw on one end and a closed ring on the other. Both ends fit the same size nut.
More about this tool
Common uses. Nuts and bolts on furniture, appliances, toilet bolts and bikes, especially where a ratchet won't fit.
How to tell it apart. The size is stamped on the shaft, and they come in inch and metric sets. The ring (box) end grips all six corners of a nut. An adjustable wrench has a sliding jaw instead of fixed ends.
One useful thing to knowBreak a tight nut loose with the box end, which is less likely to slip, then spin it off faster with the open end.
More about this tool
Used in these guides: Level a refrigerator so it stops rocking
Ratchet and socket set
Also called: socket wrench, socket set, ratchet


- 1Handle
- 2Ratchet head
- 3Direction lever
- 4Square drive
- 5Socket
- 6Extension

What it is for. A handle with a ratcheting head and a square drive that takes snap-on sockets. It keeps turning a nut or bolt without coming off after each swing.
More about this tool
Common uses. Deck and railing bolts, a water heater anode rod, furniture and appliance bolts.
How to tell it apart. Sockets come in inch and metric sets, and in 1/4, 3/8 and 1/2 inch drive sizes that must match the ratchet. Flip the small lever on the head to switch between tightening and loosening.
One useful thing to knowUse a 6-point socket on a stuck or rusty bolt. It grips the flat sides instead of the corners, so it is less likely to round the bolt off.
More about this tool
Used in these guides: Fix a wobbly deck railing, Fix a loose fence rail, Hot water smells like rotten eggs, Fix a wobbly table
Pliers
Pliers grab, hold, bend and sometimes cut. The jaw shape tells you the job.
Slip-joint pliers
Also called: combination pliers, standard pliers


- 1Flat jaws
- 2Curved pipe grip
- 3Slip joint
- 4Handles

What it is for. Everyday pliers for gripping and holding. The pivot can slip into a second hole to open the jaws wider.
More about this tool
Common uses. Holding nuts and bolts, gripping small parts, and bending wire.
How to tell it apart. The jaws have a flat front for small parts and a curved section behind it for round things. There are only two jaw positions. If you see a row of grooves for many positions, it is tongue-and-groove pliers.
One useful thing to knowSwitch the pivot to the wide position for bigger parts. Gripping a big part with the narrow setting puts all the force on the jaw tips.
More about this tool
Used in these guides: Replace a shower head or fix a leaking one, Unclog a sink without chemicals, Washer not filling with water
Often confused with: Tongue-and-groove pliers (compare →)
Tongue-and-groove pliers
Also called: channel-lock pliers, water pump pliers, groove-joint pliers


- 1Angled jaws
- 2Adjustment channels
- 3Pivot bolt
- 4Handles

What it is for. Pliers with long handles and jaws set at an angle. The pivot moves along a row of grooves, so the jaws open wide for drain nuts and pipe fittings.
More about this tool
Common uses. Plastic drain slip nuts, supply nuts, shower heads and pipe fittings.
How to tell it apart. Look for the curved channels near the pivot and jaws that point off to the side. They are the go-to tool for the big plastic slip nuts under a sink. A pipe wrench is heavier and better for steel pipe.
One useful thing to knowThe teeth chew up chrome and brass finishes. Wrap the nut with a rag or tape first.
More about this tool
Used in these guides: Find and fix a leak under the sink, Shower faucet dripping
Often confused with: Slip-joint pliers (compare →)
Needle-nose pliers
Also called: long-nose pliers, snipe-nose pliers


- 1Long thin jaws
- 2Wire cutter
- 3Pivot
- 4Handles

What it is for. Pliers with long, thin jaws that reach into tight spots and hold small parts. They also bend the wire hooks for outlet and switch screws.
More about this tool
Common uses. Bending wire hooks for outlets and switches, and reaching small parts in tight spots.
How to tell it apart. The jaws taper to a point. Most have a small cutter near the pivot for snipping wire. Bent-nose pliers are the same idea with the tip angled.
One useful thing to knowThe thin tips bend if you twist hard with them. Use slip-joint pliers for anything that needs force.
More about this tool
Used in these guides: Get a broken key out of a lock, Replace an electrical outlet, Replace a light switch safely, Microwave turntable not spinning
Cutting
Knives, saws and snips for soft materials, drywall, sheet metal and pipe.
Utility knife
Also called: box cutter, razor knife, retractable knife


- 1Blade
- 2Slider
- 3Body
- 4Nose
What it is for. A knife with a replaceable razor blade that slides in and out of the handle. It cuts drywall, carpet, caulk, tape and cardboard.
More about this tool
Common uses. Cutting drywall, carpet, old caulk, tape and boxes.
How to tell it apart. The blade is a short trapezoid and the slider locks it at one or more lengths. A snap-off knife looks similar but has a long blade scored into segments you break off. Slide the blade back in after every cut.
One useful thing to knowSwap the blade as soon as it drags. A dull blade needs more force and is more likely to slip.
More about this tool
Used in these guides: Drywall tape peeling or bubbling, Carpet ripples and wrinkles, Stop drafts around windows, Fix a crack in drywall
Hacksaw
Also called: metal saw, frame saw


- 1Frame
- 2Blade
- 3Teeth
- 4Tension knob
- 5Handle
What it is for. A fine-tooth blade held tight in a C-shaped frame. It cuts metal, bolts and plastic pipe.
More about this tool
Common uses. Cutting metal pipe, bolts, threaded rod and plastic pipe.
How to tell it apart. The blade is thin and replaceable, and the teeth should point away from the handle so it cuts on the push. A coping saw looks similar but has a deeper frame and a very thin blade for curves in wood.
One useful thing to knowUse long, steady strokes with light pressure on the push. Pressing hard on the return stroke dulls the teeth.
More about this tool
Used in these guides: Replace a cracked or loose deck board, Replace a broken fence picket, Toilet leaking at the base, Fix or replace a worn, loose or leaky exterior door threshold
Tin snips
Also called: aviation snips, metal snips, compound snips


- 1Cutting jaws
- 2Compound pivots
- 3Spring
- 4Handles
- 5Latch
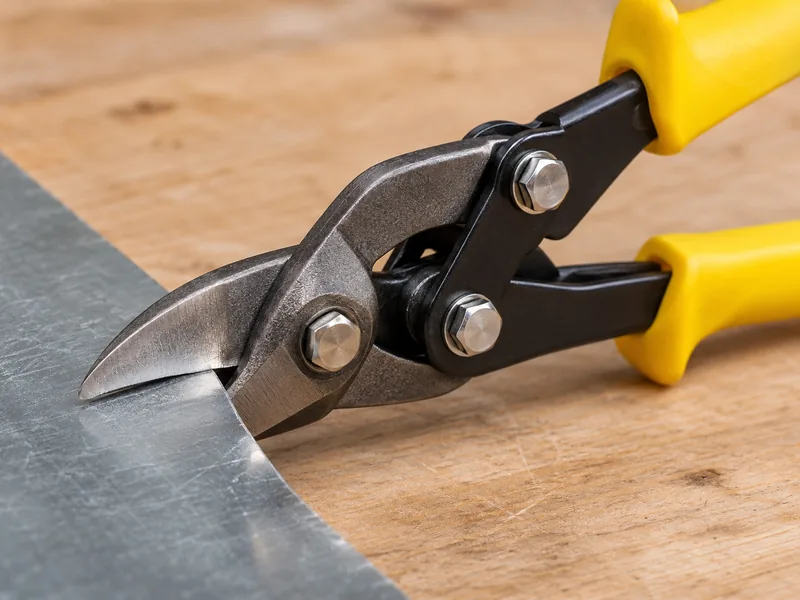
What it is for. Heavy scissors for sheet metal, flashing and vinyl. Aviation snips have a double pivot that multiplies your hand force.
More about this tool
Common uses. Cutting aluminum flashing, gutter patches, metal corner bead and vinyl trim.
How to tell it apart. Aviation snips are color coded: red handles cut curves to the left, green to the right, and yellow cut straight. Basic tin snips have one pivot and longer blades, like big scissors.
One useful thing to knowWear gloves. Fresh cut edges of sheet metal are sharp enough to slice skin.
More about this tool
Used in these guides: Gutter leaking at the seams, Fix a dented drywall corner, Fix loose or baggy carpet on indoor stairs
Drywall saw
Also called: jab saw, keyhole saw


- 1Handle
- 2Blade
- 3Sharp point
- 4Coarse teeth
What it is for. A short saw with a narrow, pointed blade and coarse teeth. Push the point through drywall, then saw out the shape you need.
More about this tool
Common uses. Cutting holes for electrical boxes and cutting out damaged drywall before a patch.
How to tell it apart. The sharp point lets you start a cut without drilling a hole first, and there is no frame. A hacksaw has a frame and fine teeth for metal.
One useful thing to knowCheck for wires and pipes before you cut. Make a small first cut and feel behind the wall before you saw further.
More about this tool
Used in these guides: Cut a hole in drywall for an old-work electrical box
Plumbing
These tools only make sense in plumbing, which is why they are easy to mix up in the store.
Plunger (cup vs flange)
Also called: sink plunger, toilet plunger, cup plunger, flange plunger


- 1Handle
- 2Cup
- 3Flat rim
- 4Rubber bell
- 5Flange
What it is for. A rubber bell on a handle that pushes and pulls water to move a clog. There are two kinds, and each fits a different drain.
More about this tool
Common uses. Clearing clogs in toilets, sinks and tubs.
How to tell it apart. A cup plunger has a flat rim that seals on flat drains like sinks and tubs. A flange plunger has a soft sleeve under the bell that fits into a toilet drain. You can fold the sleeve up to use a flange plunger on a sink.
One useful thing to knowOn a double sink or a bathroom sink, cover the other drain or the overflow hole with a wet rag. Otherwise the push escapes there instead of moving the clog.
More about this tool
Used in these guides: Unclog a toilet (without the overflow), Unclog a sink without chemicals, Toilet keeps clogging
Often confused with: Cup plunger vs flange plunger (compare →)
Toilet auger
Also called: closet auger, toilet snake


- 1Crank
- 2Handle grip
- 3Shaft
- 4Bowl guard
- 5Cable tip
What it is for. A short cable inside a bent tube, turned with a crank. It reaches past the toilet trap to break up or grab a clog a plunger can't move.
More about this tool
Common uses. Clearing toilet clogs a plunger can't move, like a toy or a wad of paper in the trap.
How to tell it apart. The bottom is bent into a J and covered with a rubber guard so it won't scratch the bowl. The cable is usually 3 to 6 feet long. A regular drain snake has no guard and can mark the porcelain.
One useful thing to knowPull the cable all the way back into the tube before you put the bend in the bowl. Starting with cable out is how the porcelain gets scratched.
More about this tool
Used in these guides: Unclog a toilet (without the overflow), Toilet keeps clogging, Toilet gurgling? Find the cause, Fix a toilet that won't flush all the way
Basin wrench
Also called: sink wrench, faucet wrench


- 1Jaw
- 2Teeth
- 3Pivot pin
- 4Shaft
- 5T-handle
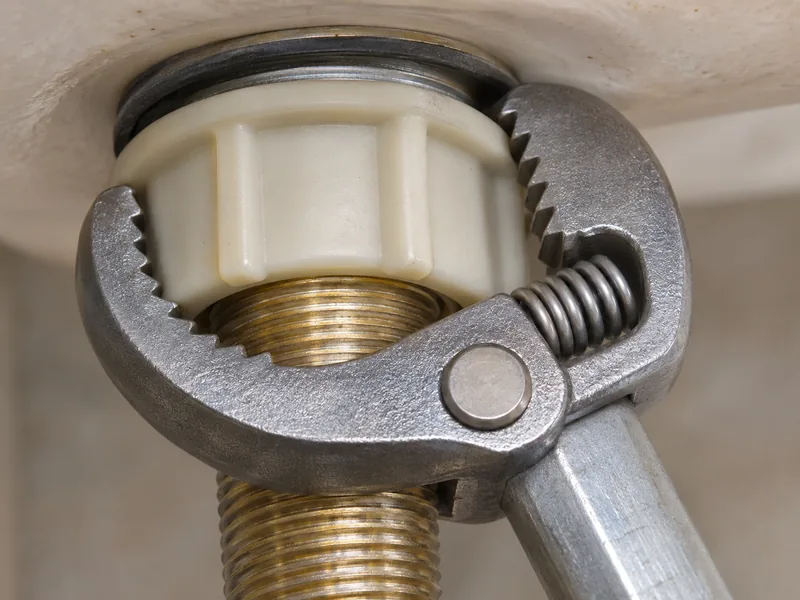
What it is for. A long shaft with a pivoting, toothed jaw on top and a sliding T-handle at the bottom. It reaches up behind the sink to the nuts that hold a faucet on.
More about this tool
Common uses. Tightening or removing faucet mounting nuts and supply nuts behind a sink.
How to tell it apart. Nothing else looks like it. The jaw flips over so the same tool tightens or loosens. Use it when there is no room to get a regular wrench or pliers on the nut.
One useful thing to knowFlip the jaw for the direction you need before you reach up. It only grips one way.
More about this tool
Used in these guides: Kitchen faucet loose at the base
Tubing cutter
Also called: pipe cutter, copper tubing cutter


- 1Cutting wheel
- 2Rollers
- 3Feed knob
- 4Frame
- 5Copper tube
- 6Deburring blade

What it is for. A clamp with a sharp cutting wheel that you spin around copper tubing. It leaves a clean, square cut.
More about this tool
Common uses. Cutting copper, brass and aluminum tubing, like water lines and supply tubes.
How to tell it apart. Look for the small cutting wheel opposite two rollers, and a knob you turn to tighten it. Many have a fold-out deburring blade. A hacksaw also cuts tubing but leaves a rough, crooked end.
One useful thing to knowTighten the knob a little after every turn or two. Cranking it down hard at once can squash the tube out of round.
More about this tool
Used in these guides: Cut copper pipe cleanly with a tubing cutter
Electrical
Check that power is off before you touch any wire, then strip and connect wires cleanly.
Non-contact voltage tester
Also called: voltage tester, voltage pen, volt stick, NCV tester


- 1Sensing tip
- 2Warning light
- 3Power button
- 4Pocket clip
- 5Battery cap
What it is for. A pen-shaped tester that lights up and beeps when its tip is near a live wire or outlet. Use it to check that power is off before you touch wires.
More about this tool
Common uses. Checking that a wire, outlet, switch or fixture is dead before you touch it.
How to tell it apart. It has no wires or probes. Test it on an outlet you know is live first, then the wires you plan to touch, then the live outlet again. A multimeter has two probe leads and reads exact voltage. A plug-in outlet tester has three lights and checks wiring.
One useful thing to knowA dead battery looks just like a dead wire. Test it on a live outlet before and after every check.
More about this tool
Used in these guides: Ceiling fan not working, Fix a loose outlet in the wall, Replace a light switch safely, Electric baseboard heater not working
Often confused with: Digital multimeter (compare →)
Wire strippers
Also called: wire stripper, strippers


- 1Stripping holes
- 2Gauge numbers
- 3Cutting edge
- 4Pivot
- 5Handles
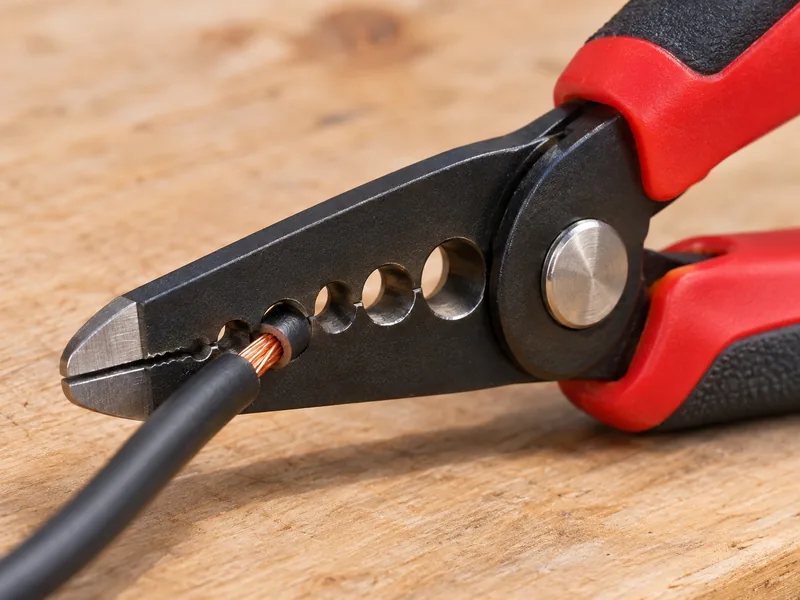
What it is for. Plier-like tool with sized holes in the jaws. Close it on a wire and pull to take off the plastic insulation without cutting the copper.
More about this tool
Common uses. Stripping insulation when you replace an outlet, switch or light fixture.
How to tell it apart. The holes are marked with wire gauge numbers. House wiring is usually 14 or 12 gauge. Most have a cutting edge near the tip. Diagonal cutters look similar but have only cutting jaws and no holes.
One useful thing to knowUse the hole that matches the gauge printed on the cable jacket. A smaller hole nicks the copper, and a nicked wire can break later.
More about this tool
Used in these guides: Replace an electrical outlet, Replace a light fixture, Replace a light switch safely
Digital multimeter
Also called: multimeter, DMM, volt meter


- 1Display
- 2Rotary dial
- 3Probe jacks
- 4Test leads
- 5Probes
- 6Rubber holster
What it is for. A meter with two test probes that measures voltage, resistance and continuity. It gives a number, where a voltage pen only beeps.
More about this tool
Common uses. Testing appliance parts like heating elements, thermal fuses and switches, and checking batteries and doorbell transformers.
How to tell it apart. It has a screen, a big rotary dial and two leads, one red and one black. A non-contact voltage tester is a single pen with no leads.
One useful thing to knowCheck continuity and resistance only with the power off and the part disconnected. Those settings are for dead circuits.
More about this tool
Used in these guides: Dryer not heating, Doorbell not working, Washing machine won't start, Refrigerator light not working
Often confused with: Non-contact voltage tester (compare →)
Painting & finishing
Tools for filling, smoothing and sealing. They make the repair look finished.
Putty knife
Also called: spackle knife, filling knife, scraper


- 1Handle
- 2Rivets
- 3Blade
- 4Edge
What it is for. A flat steel blade on a handle for spreading spackle and wood filler, or scraping off old paint and caulk. Flexible blades spread. Stiff blades scrape.
More about this tool
Common uses. Spackling nail holes, filling small dents, and scraping paint or old caulk.
How to tell it apart. Most are 1 to 3 inches wide. A drywall taping knife is the same shape but 6 inches or wider. A 5-in-1 tool has a stiff blade with a pointed corner and a curved notch.
One useful thing to knowClean the blade before the filler dries on it. Dried bits drag lines through the next coat.
More about this tool
Used in these guides: Fix nail pops in drywall, Fill nail holes in trim before painting, Drywall tape peeling or bubbling, Fill gaps between hardwood floorboards
Caulk gun
Also called: caulking gun, sealant gun


- 1Caulk tube
- 2Nozzle
- 3Cradle
- 4Plunger rod
- 5Trigger
- 6Release tab
What it is for. A frame that holds a tube of caulk or adhesive. Each squeeze of the trigger pushes a rod forward and squeezes caulk out of the nozzle.
More about this tool
Common uses. Caulking tubs, sinks, windows and trim, and applying construction adhesive.
How to tell it apart. Press the release tab at the back to stop the flow when you let go of the trigger. Some guns do this on their own and are called dripless. The cradle takes the standard 10 oz tubes.
One useful thing to knowCut the nozzle small at first. You can always cut more off, but a hole that is too big lays a bead that is too fat to tool neatly.
More about this tool
Used in these guides: Stop drafts around windows, Gutter leaking at the seams, Patch a crack in a concrete step or walkway, Fix popped deck nails that keep working up
Power tools
Battery tools that handle a lot of jobs around the house.
Cordless drill/driver
Also called: drill, drill driver, power drill, battery drill


- 1Chuck
- 2Clutch collar
- 3Speed switch
- 4Trigger
- 5Forward/reverse button
- 6Battery
What it is for. A battery drill that drills holes and drives screws. The clutch collar stops a screw before it sinks too far.
More about this tool
Common uses. Drilling holes, driving screws, and mixing small batches of thinset or paint with a mixer bit.
How to tell it apart. The chuck has three jaws that tighten around round or hex bits. Use the low speed for screws and the high speed for holes. An impact driver looks similar but has a short quick-release socket for hex bits only and hammers in bursts as it turns.
One useful thing to knowSet the clutch low and work up. On a high setting a screw can drive straight through drywall paper or strip out.
More about this tool
Used in these guides: Fix a sagging closet shelf, Fix a loose fence rail, Fix a split door jamb, Storm door won't close
Often confused with: Impact driver (compare →)
Oscillating multi-tool
Also called: multi-tool, oscillating tool, multitool


- 1Speed dial
- 2Power switch
- 3Body
- 4Blade clamp lever
- 5Blade

What it is for. A power tool whose blade moves side to side in a tiny, fast arc. It makes flush and plunge cuts where a saw won't fit, like trimming door casing or cutting out a damaged board.
More about this tool
Common uses. Undercutting door casing, cutting out a damaged board, removing grout and trimming nails flush.
How to tell it apart. The blade sticks out from the front of the head, not from a round spinning disc. Blades swap for cutting, scraping grout or sanding. A reciprocating saw is much bigger and moves its blade in and out.
One useful thing to knowLet the blade do the work. Pushing hard makes it bog down and wears out the teeth fast.
More about this tool
Used in these guides: Fix a loose floor transition strip, Fix a peeling vinyl floor tile, Install quarter round or shoe molding, Close gaps in a laminate or vinyl plank floor
Impact driver
Also called: impact


- 1Quick-release sleeve
- 2Hex bit
- 3Trigger
- 4Forward/reverse button
- 5Battery
- 6Work light
What it is for. A compact battery tool that drives screws and bolts with quick hammering bursts as it turns. It takes 1/4 inch hex bits in a quick-release sleeve.
More about this tool
Common uses. Long deck screws, lag screws, and driving a lot of screws fast.
How to tell it apart. There is no three-jaw chuck and no clutch collar, just a short sleeve you pull forward to drop in a hex bit. It is shorter than a drill/driver and rattles loudly when it starts hammering.
One useful thing to knowIt has no clutch to stop the screw, so ease off the trigger near the end. Full power can sink a screw too deep or snap a small one.
More about this tool
Used in these guides: Fix a loose deck stair tread that rocks or creaks, Fix popped deck nails that keep working up
Often confused with: Cordless drill/driver (compare →)
Which is which?
6 pairs that are easy to mix up, side by side.
Slip-joint vs tongue-and-groove pliers
- Slip-joint pliers have two jaw positions. Tongue-and-groove pliers have a row of grooves for many positions.
- Tongue-and-groove jaws sit at an angle to the handles. Slip-joint jaws point straight ahead.
- Tongue-and-groove handles are longer, so they turn big drain nuts. Slip-joint pliers are for small nuts and parts.
- If the jaws open wide enough to grip the big plastic slip nut on a sink drain, it is probably tongue-and-groove.
Adjustable wrench vs pipe wrench
- An adjustable wrench has smooth, flat jaws. A pipe wrench has teeth.
- Use the adjustable wrench on six-sided nuts and bolts. Use the pipe wrench on round pipe.
- An adjustable wrench adjusts with a small worm screw in the head. A pipe wrench has a large knurled nut on the hook jaw.
- A pipe wrench scars chrome and soft metal. Keep it off finished fixtures.
Phillips vs flathead screwdriver
- Look at the tip end-on. A Phillips shows a cross. A flathead shows a single straight line.
- A Phillips tip comes to a point. A flathead tip is flat across.
- Match the screw: an X-shaped head takes a Phillips, a single slot takes a flathead.
Cup plunger vs flange plunger
- A cup plunger has a flat rubber rim. A flange plunger has a soft sleeve under the bell.
- Use the cup on flat drains: sinks and tubs. Use the flange in a toilet, where the sleeve fits into the drain.
- You can fold the flange sleeve up and use a flange plunger on a sink. A cup plunger won't seal in a toilet.
- Keep separate plungers for the toilet and the sinks.
Cordless drill/driver vs impact driver
- A drill/driver has a three-jaw chuck. An impact driver has a short quick-release sleeve that only takes 1/4 inch hex bits.
- A drill/driver has a clutch collar that stops a screw at a set depth. An impact driver has no clutch.
- Use the drill/driver to drill holes and for small screws. Use the impact driver for long screws and bolts.
- An impact driver rattles loudly when it starts hammering. A drill/driver just turns.
Non-contact voltage tester vs multimeter
- A voltage tester is one pen with no leads. A multimeter has a screen, a dial and two probe leads.
- The voltage tester only tells you a wire is live. The multimeter gives a number for voltage and resistance.
- Use the voltage tester to check that power is off before you work. Use the multimeter to test parts like fuses, switches and heating elements.
- Test the voltage tester on a live outlet first. Test parts with a multimeter with the power off.
Non-contact voltage tester entry →Digital multimeter entry →
Quiz: what's this tool?
Ten pictures, four answers each. Pick the right name and see how to tell it apart.
The quiz needs JavaScript. Every tool is pictured in the guide below.
Check your toolbox
Tick the tools you own. We count the repair guides on this site whose required tools you have, and show which tool would unlock the most new guides.
This needs JavaScript. What can I fix? lists every repair by tool.
The count uses the tool lists in our guides. Some guides also need things this page doesn't cover, like a flashlight or a ladder; tick those on What can I fix?, which shares your choices with this page. Our guide tool lists group screwdrivers as one item, so you need both a Phillips and a flathead for it to count, and any one of the three pliers counts as pliers. These tools aren't tracked in the guide lists yet, so they don't change the count: .
Size charts
Inch (SAE) and metric sizes are not the same. A tool that is a little loose rounds off the head, so use the matching set whenever you can. The table compares each inch size with the nearest metric size. Pairs within 0.1 mm are marked close in size, but they are still not a true match. Always use the correct size; a near fit can slip and round off a tight bolt.
Hex keys (Allen keys)
| Inch size | In mm | Nearest metric | Difference | Swap them? |
|---|---|---|---|---|
| 1/16 in | 1.59 mm | 1.5 mm | −0.09 mm | Close in size, not a true match. Use the correct size; a near fit can round off a tight bolt |
| 5/64 in | 1.98 mm | 2 mm | +0.02 mm | Close in size, not a true match. Use the correct size; a near fit can round off a tight bolt |
| 3/32 in | 2.38 mm | 2.5 mm | +0.12 mm | No. Either too loose (rounds off the head) or too tight to fit |
| 7/64 in | 2.78 mm | 3 mm | +0.22 mm | No. Either too loose (rounds off the head) or too tight to fit |
| 1/8 in | 3.17 mm | 3 mm | −0.17 mm | No. Either too loose (rounds off the head) or too tight to fit |
| 9/64 in | 3.57 mm | 4 mm | +0.43 mm | No. Either too loose (rounds off the head) or too tight to fit |
| 5/32 in | 3.97 mm | 4 mm | +0.03 mm | Close in size, not a true match. Use the correct size; a near fit can round off a tight bolt |
| 3/16 in | 4.76 mm | 5 mm | +0.24 mm | No. Either too loose (rounds off the head) or too tight to fit |
| 7/32 in | 5.56 mm | 6 mm | +0.44 mm | No. Either too loose (rounds off the head) or too tight to fit |
| 1/4 in | 6.35 mm | 6 mm | −0.35 mm | No. Either too loose (rounds off the head) or too tight to fit |
| 5/16 in | 7.94 mm | 8 mm | +0.06 mm | Close in size, not a true match. Use the correct size; a near fit can round off a tight bolt |
| 3/8 in | 9.52 mm | 10 mm | +0.48 mm | No. Either too loose (rounds off the head) or too tight to fit |
Wrenches and sockets
| Inch size | In mm | Nearest metric | Difference | Swap them? |
|---|---|---|---|---|
| 1/4 in | 6.35 mm | 6 mm | −0.35 mm | No. Either too loose (rounds off the head) or too tight to fit |
| 5/16 in | 7.94 mm | 8 mm | +0.06 mm | Close in size, not a true match. Use the correct size; a near fit can round off a tight bolt |
| 3/8 in | 9.52 mm | 10 mm | +0.48 mm | No. Either too loose (rounds off the head) or too tight to fit |
| 7/16 in | 11.11 mm | 11 mm | −0.11 mm | No. Either too loose (rounds off the head) or too tight to fit |
| 1/2 in | 12.70 mm | 13 mm | +0.30 mm | No. Either too loose (rounds off the head) or too tight to fit |
| 9/16 in | 14.29 mm | 14 mm | −0.29 mm | No. Either too loose (rounds off the head) or too tight to fit |
| 5/8 in | 15.88 mm | 16 mm | +0.12 mm | No. Either too loose (rounds off the head) or too tight to fit |
| 11/16 in | 17.46 mm | 17 mm | −0.46 mm | No. Either too loose (rounds off the head) or too tight to fit |
| 3/4 in | 19.05 mm | 19 mm | −0.05 mm | Close in size, not a true match. Use the correct size; a near fit can round off a tight bolt |
| 13/16 in | 20.64 mm | 21 mm | +0.36 mm | No. Either too loose (rounds off the head) or too tight to fit |
| 7/8 in | 22.22 mm | 22 mm | −0.22 mm | No. Either too loose (rounds off the head) or too tight to fit |
Screwdriver tips
| Phillips size | Fits |
|---|---|
| #0 | Wood screws #0 and #1. Eyeglass-size and small electronics screws. |
| #1 | Wood screws #2 to #4. Small hinges, battery covers, toys. |
| #2 | Wood screws #5 to #9. Most household screws: switch plates, cabinet hinges, door hardware, drywall screws. |
| #3 | Wood screws #10 to #16. Larger screws and bolts with Phillips heads. |
- Slotted (flathead): pick a blade about as wide as the slot and as thick as the slot allows. Too narrow twists out; too wide scratches the surface around the screw.
- Torx: a six-point star. Sizes start with T, like T15 or T25. A hex key or flathead in a Torx head will strip it.
- Square (Robertson): a square socket, common in Canada. The tapered socket holds the screw on the bit. Use the size that fills the square snugly.
- Pozidriv: looks like Phillips with small extra lines between the arms. Use a Pozidriv bit; a Phillips bit slips.
Sources: inch-to-mm conversion uses the exact definition 1 inch = 25.4 mm (NIST Special Publication 811). Phillips driver sizes and wood screw sizes from the driver size table in Wikipedia: List of screw drives, which also covers Torx, Robertson and Pozidriv. Typical uses are our own notes.
Tool questions
What tools do I need for basic home repairs?
A small set covers most small fixes: a tape measure, a claw hammer, Phillips and flathead screwdrivers, an adjustable wrench, pliers, a utility knife, a plunger and a non-contact voltage tester. Our basic toolkit page lists a starter set.
How do I tell a cup plunger from a flange plunger?
Turn it over. A cup plunger has a flat rubber rim and is for sinks and tubs. A flange plunger has a soft sleeve sticking out of the bottom that fits into a toilet drain.
What is the difference between a Phillips and a Pozidriv screwdriver?
Both have a cross-shaped tip. A Pozidriv tip and screw head have small extra lines between the arms of the cross. A Phillips tip will turn a Pozidriv screw, but it slips more easily.
Are slip-joint pliers and tongue-and-groove pliers the same thing?
No. Slip-joint pliers have two jaw positions. Tongue-and-groove pliers have longer handles, angled jaws and a row of grooves that let the jaws open much wider.
Want to know which repairs your tools can handle? Tick them off on What can I fix? New to all of this? Start with easy home repairs for beginners.
Updated 2026-11-02 by the GrabTheHammer team. Spot a mistake? Tell us.