Bathroom

Replace a cracked or loose ceramic soap dish

A built-in ceramic soap dish usually loosens because its adhesive let go, or cracks because something hit it or someone leaned on it. Either way, you can often swap it without redoing the wall. Cut the grout first, then lift out a loose dish whole or break a cracked one out with light hammer taps on a cold chisel. Before any of that, check that the wall behind is dry and solid. A loose dish in a shower can be the first sign of water damage.

Hands holding a new white ceramic soap dish beside a cracked one in a taped-off tile wall above a tub, with a chisel, hammer and safety glasses on the ledge
Tape around the opening to protect the neighbor tiles before you chisel.
Quick answerWiggle the dish and press the tiles around it. If the wall is firm, cut out the grout and tape the neighbor tiles. A loose, unbroken dish can come out whole and be reset. A cracked one gets broken out from the center with a hammer and cold chisel, with safety glasses on. Set the new one with adhesive rated for shower walls, tape it so it can't slide, and wait 24 to 48 hours or as the label says before grouting.
Worth checking firstMeasure the dish before you break anything. Many built-in dishes take the place of one or two wall tiles, and sizes vary by maker. If the dish is only loose and not cracked, you can reuse it and skip the hunt for a match.
Hard2–3 hrs, plus 2–4 days curing$15–45
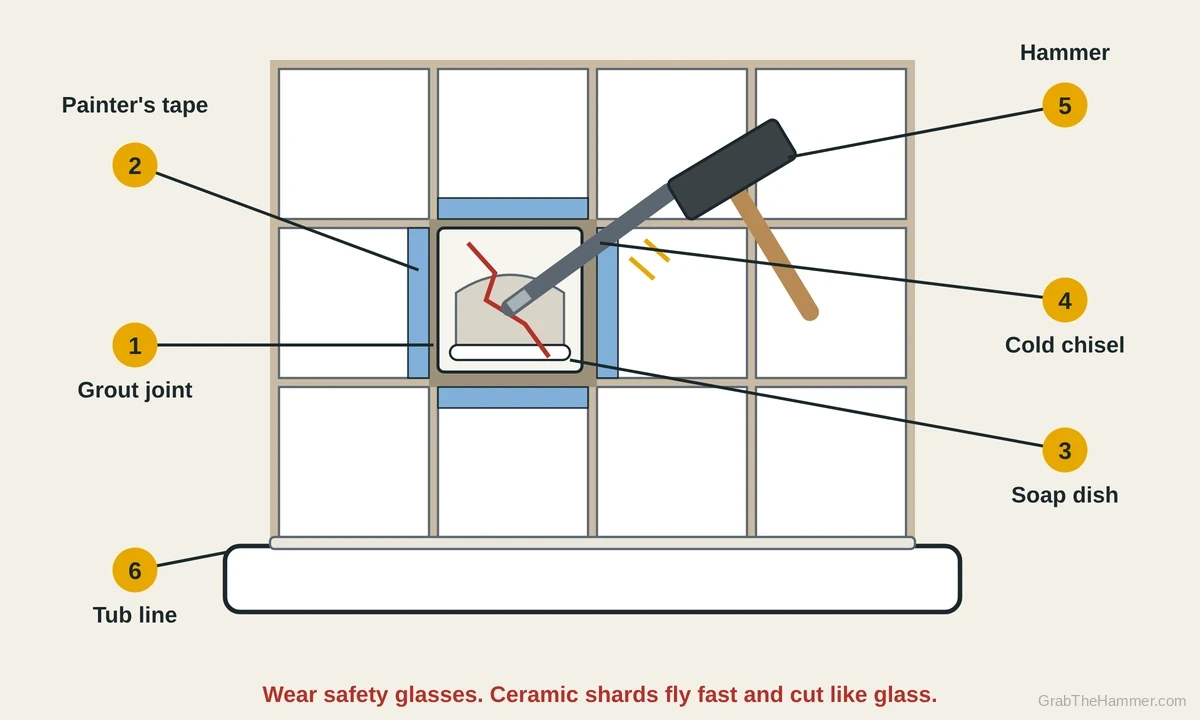
Front view of a tiled tub wall with a cracked built-in ceramic soap dish, its grout joint cut open, blue painter's tape on the edges of the tiles around it, a cold chisel held to the dish's center with a hammer above, and the caulk line where the tile meets the tub
Cut out the grout joint (1) all around. Painter's tape (2) protects the neighbor tiles. To break a cracked soap dish (3) out, hold a cold chisel (4) at its center and tap it lightly with the hammer (5). The tub line (6) gets caulk, not grout.

How a built-in soap dish is held on

A built-in soap dish is a ceramic piece made to fit in a wall of tile. It sits in the space of one or more tiles and sticks to the wall with the same kind of adhesive as the tiles. That's a cement-based thinset mortar or a premixed tile adhesive. Grout fills the joint around it and ties it to the tiles next to it.

A dish works loose when the adhesive behind it fails. These dishes are not designed to hold a person's weight, so leaning on one can pop it loose or crack it. If the tiles around the dish also sound hollow or the wall feels soft, water may be behind the tile.

Why a ceramic soap dish works loose or cracks

Used as a handhold

Pulling on it to stand up or steady yourself. It isn't a grab bar.

Adhesive failed

Old or wet adhesive let go. The dish wiggles but isn't broken.

Water behind the tile

Cracked grout or caulk let water in. Tiles sound hollow or the wall is soft.

Impact

A dropped bottle or a bump cracked the ceramic.

Not enough adhesive when installed

Gaps behind the dish let it rock and work loose over time.

What's happening?
You noticeLikely causeStart at
Dish loose plus hollow tiles or a soft wallCheck the wall first; may need a proStep 1
Dish loose or cracked, wall feels solidCut out the grout around itStep 2
Dish is crackedBreak it out with a hammer and cold chiselStep 3
Old adhesive on the wallScrape it flatStep 4
Opening is clean and drySet the dish and tape it in placeStep 5
Adhesive has curedGrout and caulkStep 6
Protect your eyes, test old adhesive and don't hang on itWear safety glasses the whole time you're cutting grout or chiseling. Ceramic chips fly fast and have edges like glass. Wear a dust mask while cutting grout. In homes built before about 1980, old tile adhesive may contain asbestos. Don't chisel, sand, grind or scrape it until a sample is tested by a trained, accredited professional. A ceramic soap dish isn't designed to hold body weight, so never use it as a grab bar. If the wall behind is soft, wet or moldy, stop and call a pro.

Let's fix it

0 of 6 done
  1. Check the dish and the wall behind itWiggle the soap dish gently. Then tap the tiles around it with a screwdriver handle. Solid tile sounds sharp, and a dull, hollow sound means the adhesive behind it let go. Press the wall around the dish. If tiles flex, the wall feels soft, or you see dark stains or crumbling grout, water may be behind the tile. Stop there and call a tile pro, because the backing may be rotted or moldy. If the wall is solid, decide which job you have. A loose but intact dish can come out whole and be reset. A cracked one needs a matching replacement. Measure it now. Many are sized to fit standard 4-1/4 or 6 inch tile, but check yours.
    Something went wrong?
    • Several tiles near the dish sound hollow That points to a wider adhesive or water problem. Don't reset one piece into a failing wall. Have a tile pro open it up and check the backing.
    Ceramic soap dish set into a tile wall with yellow arrows showing a gentle side to side wiggle, a screwdriver handle tapping the grout below it, and a red no-symbol warning against using it as a handhold
  2. Cut out the grout and tape the neighborsPut on safety glasses and a dust mask. Cutting grout makes fine dust that you shouldn't breathe. Run a carbide grout saw back and forth along each joint around the dish. Or use an oscillating tool with a grout blade at low speed. Keep the blade in the middle of the joint and go down until you reach adhesive or the wall. Take light passes. A blade that slips can scratch the glaze on the next tile. Then put painter's tape along the edges of the tiles around the dish to help protect them. A loose dish may now lift out by hand. Never pry it against a good tile.
    Something went wrong?
    • The saw keeps jumping out of the joint Start with short strokes to cut a shallow groove, then lengthen them. A hand grout saw is slower but easier to control than a power tool.
    Grout saw cutting the grout joint beside a cracked ceramic soap dish, with blue painter's tape on the edges of the tiles around it, arrows showing the back and forth motion, and a dust mask nearby
  3. Break out a cracked dish with hammer and chiselSkip this step if the dish came out whole. With safety glasses and gloves on, use a cold chisel and a regular claw hammer or a small sledge. Hold the chisel's tip at the center of the dish face, where the crack is. Tap the chisel with light, controlled taps until the ceramic breaks. See how to use a hammer for a safe grip. Then work outward toward the edges, driving toward the center, not toward the tile next to it. Keep the chisel at a low angle near the edges. Pull out pieces as they loosen. If light taps don't break it, reposition the chisel rather than swinging harder. Hard blows can crack the backing or the neighbor tiles.
    Something went wrong?
    • A neighbor tile chipped or cracked Stop and check it. A small edge chip may hide under grout. A crack means that tile needs replacing too. See how to replace a cracked wall tile.
    • Big pieces won't let go The adhesive is strong there. Break the piece smaller, then work a stiff putty knife behind it. Don't lever against the good tile.
    Cracked ceramic soap dish with a cold chisel held at its center and a hammer tapping the chisel end, short yellow lines showing light taps, red chips flying and safety glasses beside
  4. Scrape the old adhesive flatClean the opening so the dish can sit flush with the tile around it. In a home built before about 1980, stop here until the old adhesive is tested for asbestos. Otherwise, scrape the lumps off with a stiff putty knife or a margin trowel. For hard spots, hold the cold chisel nearly flat to the wall and tap it lightly with the hammer. Don't gouge the backing. If you're reusing the old dish, scrape the old adhesive off its back too, so it sits flat. Scrape loose grout from the edges of the neighbor tiles. Vacuum, and let the opening dry out completely. If the backing is soft, crumbling or wet, stop and call a pro.
    Something went wrong?
    • I gouged the backer or drywall Fill a shallow gouge with a little adhesive and let it set before setting the dish. A wide or deep hole, or wet backing, needs a proper patch first.
    Empty opening in a tiled wall with lumps of old gray adhesive, a putty knife scraping them off with an arrow showing the motion, and a red tag reminding to test old adhesive
  5. Set the dish and tape it in placeDry-fit the dish first. It should sit flush with the tile face and leave an even joint all around. Use an adhesive the maker rates for shower walls and tub surrounds. Some premixed adhesives say so on the label, and others say they're not for constant water or steam. Spread adhesive on the back of the dish and on the wall, so the back has full contact. Press it in with a slight twist until it's flush. Then run strips of painter's tape from the dish up onto the tiles above. A soap dish is heavy at the front and tends to slide while the adhesive is soft. Leave it to cure as the label says, often 24 to 48 hours.
    Something went wrong?
    • The dish keeps sliding down Add more tape, pulled tight up onto the tiles above. Some people also wedge tile spacers in the bottom joint. Recheck it after 15 to 20 minutes.
    New ceramic soap dish pressed into the wall opening with two strips of blue painter's tape running from the dish up onto the tile above to hold it, an arrow showing it pressed in and a green check
  6. Grout, caulk and wait before showeringAfter the adhesive cures, peel off the tape and pull any spacers. Pick grout by joint width, as the grout maker says. Non-sanded grout is often rated for joints up to 1/8 inch, and sanded grout for wider joints. Press grout into the joint with a rubber float held at an angle. Wipe the haze with a damp sponge. If the dish sits near the tub, don't grout the corner where the tile meets the tub. That joint gets matching tub and tile caulk, because it moves. Wait before showering as the grout label says, often 72 hours for cement grout. Then seal the grout if the maker recommends it.
    Something went wrong?
    • The new grout doesn't match New grout often looks a little different from old grout. A grout colorant pen can help, or regrout the small area around it so it matches.
    Rubber grout float pressing grout into the joints around the new soap dish, a damp sponge beside it, and a fresh caulk line where the bottom row of tile meets the tub

Watch it done

Replace Ceramic Soap Dish - or a Broken Tile - in Your Bathroom or ShowerBy DIY DUO on YouTube. Their method may vary a little from ours.
Watch on YouTube
How you'll know it's fixed
  • The dish sits flush and doesn't move when you press it gently
  • Tiles around it still sound solid when you tap them
  • The grout joint is full and even all around
  • The corner at the tub is caulked, not grouted

Dish rocks or sounds hollow? The adhesive may not have full contact. Reset it before you grout.

If it comes back

If the dish works loose again, water may be getting behind it, or someone is still using it as a handhold. Check the grout around it. Cracked or missing grout lets water in, so see how to regrout tile. If people need something to hold onto, have a real grab bar installed into the framing.

If the caulk at the tub keeps splitting or getting moldy, redo it. See how to recaulk a bathtub.

If a plain tile near the dish cracked during the job, swap it the same way. See how to replace a cracked wall tile. For a refresher on light, controlled taps, see how to use a hammer.

Tape beats holding itDon't stand there holding the dish while the adhesive grabs. Run two or three tight strips of painter's tape from the dish up onto the tiles above, then check it once after a few minutes.
Renting?In a rental, a loose or cracked built-in soap dish is usually the landlord's repair. Photo it and report it. Don't chisel out tile without permission. Tell them right away if the wall feels soft or tiles sound hollow.
Call a tile pro ifTiles around the dish sound hollow or move, the wall is soft or stained, there's mold behind the tile, the old adhesive may contain asbestos, or you can't find a dish that fits. Stop if chiseling cracks the tiles next to it.Fix it yourself or call? Compare the cost →

What a pro typically charges (a rough estimate; prices vary by area): A tile installer or handyman typically charges about $100–$300 to replace a soap dish or a few wall tiles. Water damage repairs cost much more.

Find a tile pro near you

Something else going on?

Ceramic soap dish questions

How do you remove a ceramic soap dish from a tile wall?

Cut out all the grout around it first and tape the tiles next to it. A loose dish may then lift out whole. A cracked one is broken out from the center with light hammer taps on a cold chisel.

Can I reattach a loose ceramic soap dish?

Usually, if it isn't cracked and the wall behind is solid. Scrape the old adhesive off the dish and the wall, set it with adhesive rated for shower walls, tape it in place and grout once it cures.

What adhesive do you use for a ceramic soap dish in a shower?

Use a tile adhesive or thinset the maker rates for shower walls. Read the label and follow its cure time before grouting.

Can a ceramic soap dish be used as a grab bar?

No. A tiled-in soap dish is held by adhesive and isn't designed to hold body weight. If you need support, install a real grab bar fastened into the framing.

How long before I can shower after replacing a soap dish?

Wait for the adhesive to cure, often 24 to 48 hours, then grout. Cement grout often needs about 72 hours before regular water exposure. Check both labels.

Reader reports

Did this fix work for you?

Tell the next person how it went. Your numbers are added to the totals anonymously; tips are read by our team before they appear.

How did it go?
Reader Q&A

Questions from readers

No questions on this guide yet. If you're stuck, ask below. Useful questions and answers get added here for the next person.

Ask a question

We read every question before anything is published, and we never show names or emails. Please leave out personal details. PrivacyAccessibility

About the authors

GrabTheHammer Team

  • No sponsored picks
  • Safety first
  • Tells you when to call a pro

We're a small team of writers and editors who check every guide against manufacturer instructions and common code requirements. Our goal is to help you understand the problem, tackle what you safely can and know when to call a pro.

Checked against: Custom Building Products SimpleFix pre-mixed adhesive technical data sheet; Daltile bath accessory product listings; US EPA asbestos guidance for homeowners.

How we write and review →
A helpful next stepHow to regrout tileRefresh the grout around the new dish.