Install chair rail molding to protect your walls
Chair rail is a strip of molding that runs around the wall at about the height of a chair back. It takes the bumps that would otherwise scuff and dent your paint. You can install it with a tape measure, a level, a stud finder, a miter box and saw, a hammer and a nail set. The planning matters most: a level line and clean corners.


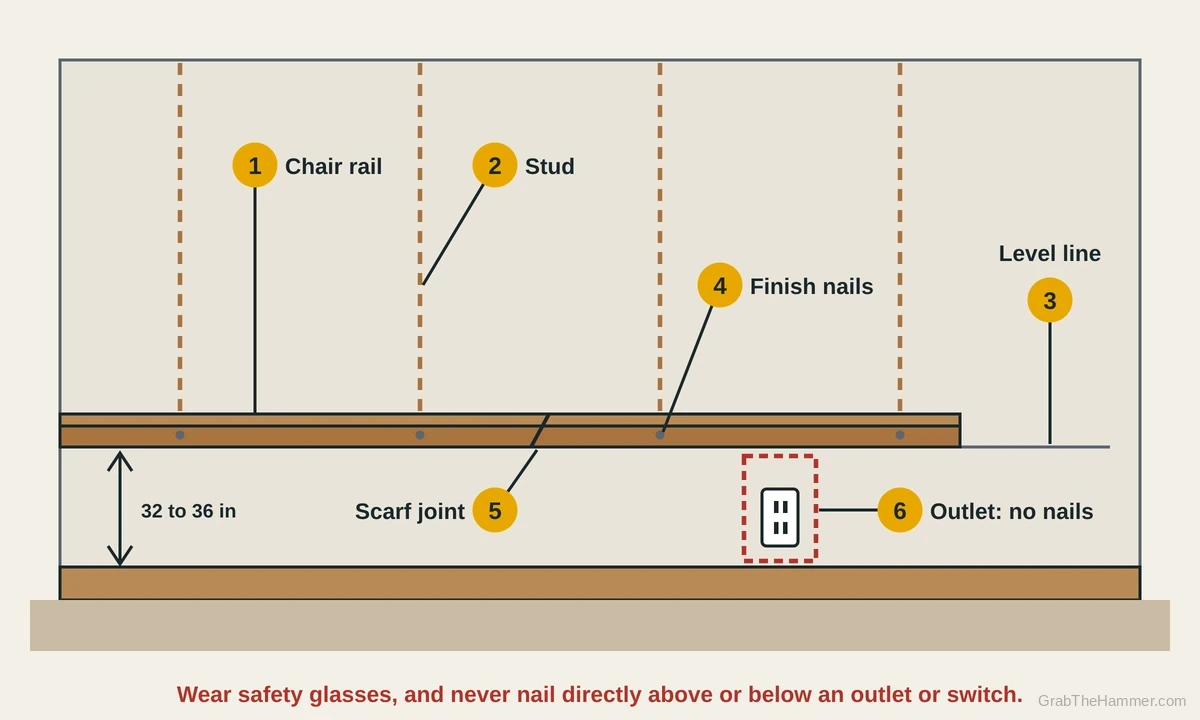
What chair rail does and where it goes
Chair rail is a horizontal molding, usually 2 to 3 inches tall, that sticks out a little from the wall. When someone pushes a chair back, the top of the chair hits the rail instead of the paint. Molding maker Metrie gives one third of the wall height as a common rule. That works out to about 32 inches on an 8-foot wall.
Many people set it somewhere between about 32 and 36 inches. For protection, aim for where your chair backs touch. Chair rail is nailed into the wall studs, which are often spaced 16 inches apart in houses. Drywall alone holds nails poorly, so each piece should catch at least two studs. Some installers add construction adhesive for extra hold.
Why you might want chair rail
You see gray marks or small dents in a line at chair height in a dining room or kitchen.
A rail gives a natural break, so the line between colors never has to be perfect.
The top edge of beadboard or panels looks raw and needs a molding to finish it.
Strollers, carts or bags leave marks at the same height along a busy wall.
There are nail holes or a paint line where a rail used to be, or a piece is split.
| You notice | Likely cause | Start at |
|---|---|---|
| Not sure about height or studs | Measure your chairs and find the studs | Step 1 |
| Height picked | Draw a level line around the room | Step 2 |
| Line drawn | Measure and cut the corners | Step 3 |
| Wall is longer than your molding | Join pieces with a scarf joint and dry fit | Step 4 |
| Everything fits | Nail it into the studs | Step 5 |
| Nailed and tight | Set the nails, fill, caulk and paint | Step 6 |
Let's fix it
- Pick the height and find the studsPush a dining chair back against the wall. Measure from the floor to the top of the chair back. Many people set the rail between about 32 and 36 inches, often near one third of the wall height. Pick a height that covers where your chairs hit. Then find the studs with a stud finder, a magnet or by tapping. Mark each one with a light pencil tick just above your rail height, so the rail will hide it. Studs are often 16 inches apart. Note every outlet and switch on the wall. Plan to keep nails well to the side of them, because cables run up and down from boxes. If the wall is plaster and you can't find studs, see our stud guide first.

- Draw a level line around the roomMeasure up from the floor at one stud mark to your chosen height for the bottom edge of the rail. Hold a 4-foot level with its top edge on that mark. Center the bubble and draw a light pencil line along it. Slide the level along, overlap the last few inches of line, and keep going around the room. Floors are often not level, so follow the level, not the floor. If the floor slopes so much that the line ends up more than about 1/4 inch off your height at a corner, you can split the difference so the rail looks even against the floor. A laser level makes this faster if you have one. Don't press hard, so the paint or rail hides the line.

- Measure and cut the cornersMeasure each wall along the line. For an inside corner, measure into the corner. For an outside corner, measure to the corner edge. Cut outside corners as two 45-degree miters in a miter box with a fine-tooth saw, so the long point of each piece reaches the corner. For inside corners, you can miter both pieces at 45 degrees. A coped joint holds up better as the house moves. Cut the first piece square into the corner. Miter the second piece, then cut along the profile line with a coping saw, angled back a little. Wear safety glasses and keep your hand behind the saw. Cut each piece slightly long, then trim to fit. Room corners are often not exactly 90 degrees.

- Join long walls and dry fit everythingIf a wall is longer than one piece of molding, join two pieces with a scarf joint. Cut both ends at matching 45-degree angles so they overlap, instead of butting square ends. Place the joint over a stud so both pieces get a nail there. Now hold every piece up on the line without nails. Check that corners close, ends meet the door casing cleanly and the bottom edge sits right on your pencil line. Mark any piece that needs trimming. Where the rail meets door or window casing, cut it square and butt it to the casing. Number the back of each piece so you put it back in the same order.

- Nail the rail into the studsPut on safety glasses. Use 2 to 2-1/2 inch finish nails, or a brad nailer with nails long enough to reach well into the stud. Set the bottom edge on your line. At each stud mark, drive two nails, one near the top and one near the bottom of the rail. Angle them slightly toward each other so they lock the rail. Use a 16 oz claw hammer and controlled taps, holding the handle near the end. Stop with the head slightly proud so you don't dent the wood. Never nail directly above or below an outlet or switch, because cables often run there. If you add construction adhesive, run a thin bead on the back first. If you hear a nail hit metal, stop and move over.

- Set the nails, then fill, caulk and paintHold a nail set on each nail head and tap it with the hammer until the head sits about 1/16 inch below the surface. Fill each hole with wood filler or spackle, slightly overfilled. Let it dry as the label says, then sand it flush with fine paper. In pre-1978 homes, don't sand old wall paint unless it tested negative for lead. Run a thin bead of paintable caulk along the top edge where the rail meets the wall, and smooth it with a damp finger. Let the caulk cure as its label says. Then prime any bare wood and paint.

Watch it done
- The rail is level by eye and on the level
- Corners close with no gap you can see from a few feet away
- Every piece is nailed into at least two studs and doesn't move when pushed
- Nail heads are filled, the top edge is caulked and the paint is dry
Still a gap at a corner? Fill small gaps with caulk or recut the piece.
If something isn't right
If a piece pulls away from the wall, the nails may have missed the stud. Find the stud again and add a nail there, angled a little. Our hammer guide covers controlled taps and using a nail set without denting trim. To find studs more reliably, see how to find a wall stud.
If a corner opens up after a few months, the wood has likely shrunk. See fixing a gap in a trim corner. For a smooth finish over nail holes, filling nail holes in trim walks through filler and sanding.
If the wall above or below the rail still has old marks, clean them before you paint. Our guide to removing scuff marks from walls starts with the gentlest method. For leftover patches, touching up wall paint helps it blend.
What a pro typically charges (a rough estimate; prices vary by area): A carpenter or handyman typically charges about $3–$10 per linear foot to install chair rail, plus materials. Painting and stairs cost more.
Find a trim carpenter near you