Doors & windows

Replace or reset door stop molding on an interior door

Door stop molding is the thin strip on the door jamb that the door closes against. When it splits, works loose or sits in the wrong spot, the door can rattle, swing past the latch or refuse to latch at all. You can usually fix it with a utility knife, a putty knife, a small pry bar, a hammer and a nail set. Close the door and look at the stop first: a loose piece can often be reset. A split piece gets replaced.
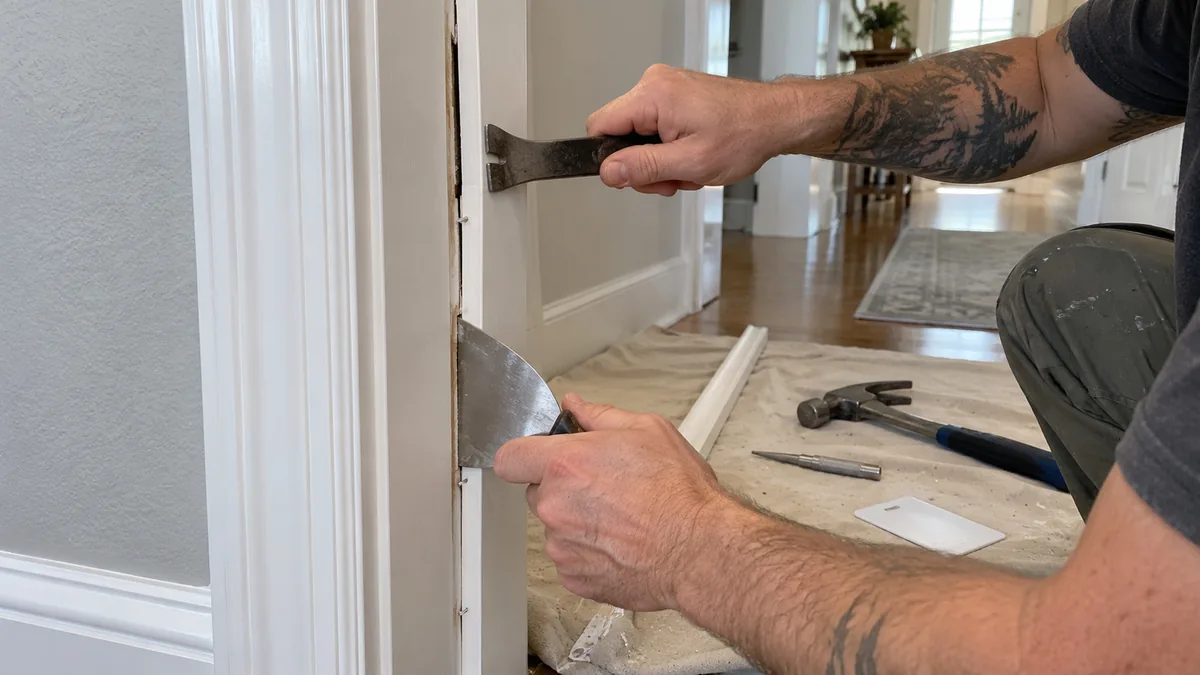
Hands prying door stop molding off a white door jamb over a putty knife, with new molding, a hammer and a card spacer on a drop cloth
A putty knife under the pry bar protects the jamb paint.
Quick answerClose the door and slide a credit card between the door face and the stop. If the gap is wide or uneven, the stop is in the wrong spot or loose. Score the paint line, pry the stop off over a scrap block and pull the nails out through the back. Reuse it if it's whole, or cut a matching piece. Set it with a card as a spacer, nail it with finish nails, and sink the heads with a nail set.
Worth checking firstBefore you pull anything, check the latch. If the door rattles but the stop is tight, the strike plate may just need a small tweak. See our guide to a door that rattles when closed. If the latch misses the hole, read a door that won't latch first. Moving the stop only helps when the stop itself is the problem.
Moderate1–2 hours, plus paint drying time$10–30 for molding and nails
Top-down cutaway of an interior door frame on the latch side, showing the wall, the wood jamb, casing trim on both faces, the narrow stop molding nailed to the jamb, and the closed door resting against the stop with a thin gold card-width gap between them
The jamb (1) lines the opening. The stop molding (2) is nailed to it, and the closed door (3) rests against it. A card-thin gap (4) lets the door close quietly. Finish nails (5) hold the stop, and the casing (6) covers the wall edge.

What door stop molding does

Door stop molding is a thin wood strip nailed to the face of the door jamb, on the two sides and across the top. When the door closes, its face lands against the stop. The stop keeps the door from swinging through the frame. A common interior profile is about 7/16 inch thick and 1-3/8 inches wide, but sizes vary by house and age.

Stops are usually held with a few small finish nails, not glue, so they are meant to come off and move. Builders often set them with the door closed and a thin gap so the door doesn't bind when paint builds up. If the stop sits too far from the door, the door rattles against the latch. If it sits too close, the latch can't catch.

Why door stop molding fails

Nails worked loose

One end of the stop pulls away from the jamb or moves when you press it.

The stop is split or broken

You see a crack along the grain or a missing chunk, often near a nail.

The stop sits too far from the door

The door rattles or moves when you push it while it's latched.

The stop sits too close to the door

You have to push hard to make the latch catch, or it won't catch.

It was pried off and never reset

Old nail holes show, and the stop is crooked or missing a piece.

The latch or strike is the real problem

The stop is tight and straight, but the latch misses its hole.

What's happening?
You noticeLikely causeStart at
Not sure what's wrongClose the door and check the gap with a cardStep 1
Loose, split or in the wrong spotScore the paint and pry the stop offStep 2
Nails stuck in the old piecePull them out through the backStep 3
Piece is split or missingMeasure and cut a matching profileStep 4
Ready to reinstallSet it with a card spacer and nail itStep 5
Nailed and tightSet the nails, fill, caulk and paintStep 6
Wear safety glasses, protect the jamb and test old paintWear safety glasses for every pry and every hammer blow. A thin stop can snap and a small nail can fly. Keep a utility knife blade pointed away from your other hand and change dull blades. Put a scrap block or a putty knife under any pry bar so you don't crush the jamb. In homes built before 1978, the paint may contain lead. Test it before you score, scrape or sand, and if it's positive, use lead-safe practices or hire a certified contractor.

Let's fix it

0 of 6 done
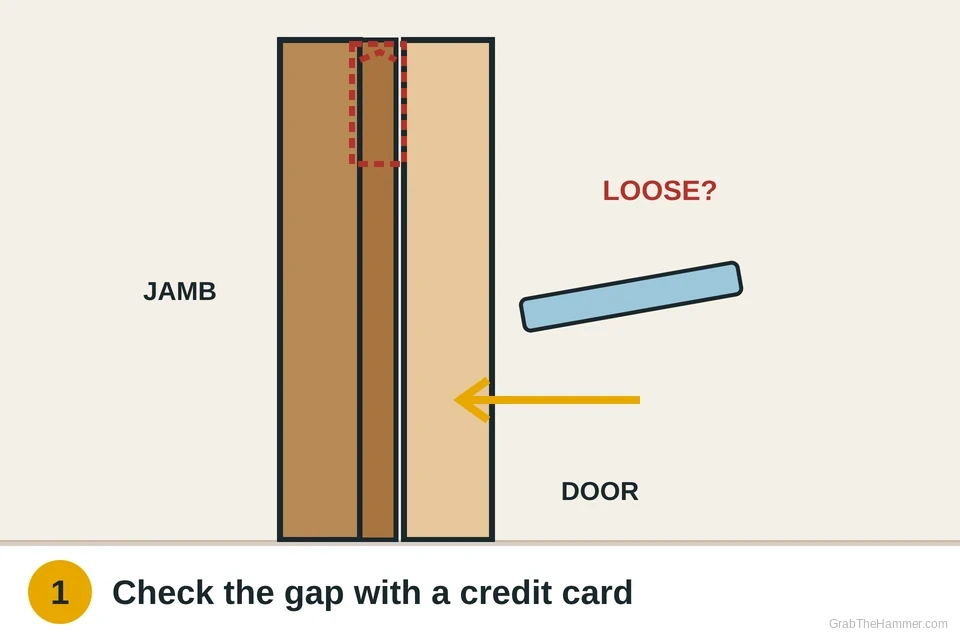
  1. Close the door and check the stopClose the door until it latches. Press lightly on the door near the latch. A well-set stop lets the door move only a tiny bit. Now slide a credit card between the door face and the stop, top to bottom. It should slip in with light drag along the whole length. If the gap is much wider, the stop is too far away and the door rattles. If the card won't go in and the latch is hard to catch, the stop is too close. Press the stop with your thumb to find loose spots, and look for cracks along the grain. If the stop is tight, straight and the gap is even, stop here. The latch or strike is the likely cause instead.
    Something went wrong?
    • The gap is fine but the door still rattles Adjust the strike plate. See our guide to a door that rattles when closed.
    Closed interior door seen edge-on at the jamb, with a credit card sliding into the thin gap between the door face and the stop molding, and a red dashed gap where the top of the stop has pulled away from the jamb
  2. Score the paint and pry the stop offPut on safety glasses. If the house was built before 1978, test the paint for lead first. Run a sharp utility knife along both edges of the stop, where paint bridges it to the jamb. Start near a nail. Tap a stiff putty knife into the joint with light hammer taps and lever it gently. Once there's a gap, slide in a flat pry bar with a scrap block or a second putty knife under it, so the bar presses on the block and not the jamb. If the stop cracks as it lifts, keep going slowly; you'll replace it anyway.
    Something went wrong?
    • The jamb is dented or splitting Stop and move the bar to a nail spot. Use a wider block to spread the force.
    • Paint peels off the wall with it Score deeper before prying the next section.
    Utility knife scoring the paint line along a stop molding, and a flat pry bar resting on a scrap wood block lifting the stop away from the jamb
  3. Pull the old nails out the backLay the old stop face down on a towel or a piece of cardboard. Finish nails usually stay in the stop when it comes off. Don't hammer them back out the front, because that splinters the painted face. Instead, grip each nail near the back surface with locking pliers or end-cutting nippers. Roll the pliers on their jaw to pull the nail through the back. The small head slips through and leaves a clean hole on the face. Pull any nails left in the jamb the same way, or snip them flush and set them below the surface with a nail set. Leave no nail tips sticking out where your new stop will sit. If the old stop is whole and straight, keep it to reuse.
    Something went wrong?
    • A nail breaks off in the jamb Sink the stub with a nail set so it sits below the surface, then move on.
    Stop molding lying face down with a finish nail poking out of its back, and locking pliers rolling the nail out through the back side
  4. Measure and cut a matching pieceMeasure the old stop's thickness and width, and take a short piece to the store if you can. A common colonial or ranch stop is about 7/16 by 1-3/8 inches, but older homes may differ. Measure each run on the jamb, from the floor to the head stop or corner to corner. The head piece usually runs across the top first. Side pieces butt up to it, or meet it in a 45-degree miter if the old stop was mitered. Cut in a miter box with a fine-tooth saw. Cut a little long, test the fit and trim. A snug fit that you can press in by hand is right.
    Length of stop molding held in a plastic miter box with a handsaw cutting through it at a 45-degree slot, and an arrow showing the saw stroke
  5. Set it with a spacer and nail itClose and latch the door. Hold the stop against the jamb, with its face against the door. Slip a credit card between the door and the stop as a spacer, which leaves roughly 1/32 inch. Press the stop lightly against the card. Start about 2 inches from each end. Drive a 1-1/2 inch finish nail or brad through the stop into the jamb, using controlled taps with a claw hammer. Space nails roughly every 12 to 16 inches. Stop each nail with the head slightly proud so you don't dent the wood. Open and close the door. It should latch with a soft click and not rattle. If it binds, pull that nail and move the stop.
    Something went wrong?
    • The nail bends Pull it with pliers over a putty knife and drive a new one beside the hole.
    • The thin stop splits Pre-drill with a bit slightly smaller than the nail, or blunt the nail tip with a tap.
    Closed door edge with a credit card held between the door face and a new stop molding, while a claw hammer drives a finish nail through the stop into the jamb
  6. Set the nails, then fill, caulk and paintHold a nail set on each head and tap it with the hammer until the head sits about 1/16 inch below the surface. Fill each hole with wood putty or spackle, slightly overfilled. Let it dry as the label says, then sand it flush with fine paper. In pre-1978 homes, skip sanding old paint unless it tested negative. Run a thin bead of paintable caulk along the joint between the stop and the jamb, and smooth it with a damp finger. Prime bare wood and paint to match. Let the paint dry fully before you close the door, or it may stick to the stop.
    Nail set held on a finish nail head in the stop molding while a hammer taps it below the surface, with a putty knife filling an earlier nail hole

Watch it done

How to Replace Door Stop Molding on Interior DoorBy John C RV on YouTube. Their method may vary a little from ours.
Watch on YouTube
How you'll know it's fixed
  • The door latches with a soft click and no extra push
  • Pushing on the latched door causes little or no rattle
  • A credit card slides between door and stop along the whole length
  • Nail heads are below the surface, filled and painted over

Still rattling with an even gap? The strike plate likely needs a small adjustment.

If it comes back

If the stop loosens again, the nails may have hit an old hole or missed solid wood. Reset it with nails a little longer and slightly off the old holes. Our hammer guide covers controlled taps and using a nail set without denting trim.

If the casing corners above the door have opened up, fix them at the same time. See fixing a gap in a trim corner. For small holes left over, filling nail holes in trim shows how to get a smooth finish.

If the door still won't latch with the stop set right, the strike plate or hinges are likely off. Read a door that won't latch. A door that rattles even with a good stop is covered in a door that rattles when closed.

Mark the door line before you pull a good stopIf the stop is whole and only needs a small shift, draw a light pencil line along its edge on the jamb before you remove it.
Renting?In a rental, door trim belongs to the landlord, so ask before you pry anything off. Pressing a lifted nail back with a nail set is usually fine. Report a split stop, a door that won't latch or any paint that is chipping in an older building.
Call a carpenter or handyman ifThe jamb itself is split or loose, the door sags or rubs on the frame, the stop is a hard-to-match custom profile, or the paint tests positive for lead. Stop if the jamb moves when you pry; that needs more than a new stop.Fix it yourself or call? Compare the cost →

What a pro typically charges (a rough estimate; prices vary by area): A handyman typically charges about $75–$200 to replace door stop molding on one door, plus materials. Lead-safe work or jamb repair costs more.

Find a handyman near you

Something else going on?

Door stop molding questions

How do you remove door stop molding without damaging it?

Score the paint line with a utility knife, then lift the stop with a putty knife and a small pry bar over a scrap block. Pull the nails out through the back so the face stays clean.

What size is door stop molding?

A common interior stop is about 7/16 inch thick and 1-3/8 inches wide, often in colonial or ranch profiles. Older homes vary, so measure the old piece or bring a sample to the store.

How much gap should be between the door and the stop?

Builders often use a thin spacer, like a credit card, which leaves roughly 1/32 inch. The door should latch without a push and not rattle.

What nails do you use for door stop molding?

Small finish nails or brads, often about 1-1/2 inches long, driven into the jamb. Sink the heads with a nail set, then fill the holes.

Can I move door stop molding to stop a door from rattling?

Yes, if the stop is too far from the door. Pry it off, set it back with a card spacer against the closed door and renail it. If the gap is already even, adjust the strike plate instead.

Reader reports

Did this fix work for you?

Tell the next person how it went. Your numbers are added to the totals anonymously; tips are read by our team before they appear.

How did it go?
Reader Q&A

Questions from readers

No questions on this guide yet. If you're stuck, ask below. Useful questions and answers get added here for the next person.

Ask a question

We read every question before anything is published, and we never show names or emails. Please leave out personal details. PrivacyAccessibility

About the authors

GrabTheHammer Team

  • No sponsored picks
  • Safety first
  • Tells you when to call a pro

We're a small team of writers and editors who check every guide against manufacturer instructions and common code requirements. Our goal is to help you understand the problem, tackle what you safely can and know when to call a pro.

Checked against: Metrie, What is door stop moulding (metrie.com); Home Depot product listing for WM876 7/16 x 1-3/8 inch pine stop moulding; US EPA, Protect your family from exposures to lead (epa.gov).

How we write and review →
A helpful next stepFill nail holes in trim before paintingFill and touch up the nail holes for a clean finish.