Carpentry

Cut a board square with a speed square

A crooked cut leaves gaps at a shelf end, a deck board or a piece of trim. The fix is a speed square, a small triangle with a lip that hooks on the board's edge. It gives you a true 90-degree line in seconds, and it can guide a circular saw too. First check that the board's factory end is square, because many aren't. Then measure, mark, and cut on the waste side of the line.

Hands holding a speed square against the edge of a pine board on sawhorses and drawing a pencil line, with an X on the waste side
Hook the square's lip on the edge and draw the line, X on the waste side.
Quick answerHook the speed square's lip tight on the board's edge and check the factory end; trim it if you see a gap. Measure your length and mark a V. Slide the square to the mark, draw the line, and put an X on the waste side. Clamp the board, set the blade so less than one tooth shows below it, and cut with the whole blade on the X side. Check the new end with the square and sand the edges.
Worth checking firstMeasure the space where the board goes, not just the old board, which may be broken or cut short. For a shelf that bows in the middle, the cut isn't the problem; see fixing a sagging shelf. If the job is a short piece of trim, a miter box and handsaw may be simpler than a power saw.
Easy15–30 minutes per cut$10–20 for a speed square, plus the board
Top view of a board with a factory end on the left, a speed square hooked by its lip on the near edge, a pencil line along the square's straight side, an X on the waste side, and the saw blade kerf shown on the waste side of the line
Start from a square factory end (1). Hook the lip, or fence (2), tight on the edge and draw the pencil line (3) along the straight side. An X (4) marks the waste side, and the blade kerf (5) goes entirely on that side so the piece stays full length.

How a speed square gives you a square line

A speed square is a triangle of aluminum or plastic, usually 7 or 12 inches on a side. One edge has a thick lip, or fence, that hangs over the edge of the board. The straight side next to it is set at exactly 90 degrees to the lip. When the lip is pressed flat against a straight board edge, a line drawn along that side is square to the edge.

The same lip makes it a saw guide. This Old House calls it an instant fence: you press the lip to the board's edge, set the saw's base against the square, and run the saw along it. Pro Tool Reviews notes the method works for straight 90-degree and 45-degree cuts in boards up to about the square's size. A 7-inch square handles boards up to a 2x8, and a 12-inch square up to a 2x12.

Why a board cut comes out crooked or short

The factory end isn't square

You measured from an end that was already off, so the new piece is too.

The square's lip wasn't tight

If the lip lifts off the edge, the line tilts with it.

Measured or read the tape wrong

A 1/8 inch misread or measuring the old, broken board.

Cut on the line, not beside it

The 1/8 inch blade kerf comes out of your piece instead of the waste.

The saw drifted or the board moved

An unclamped board or a sideways push pulls the cut off the line.

The board was pinched or the blade is dull

Binding can make the saw wander, burn the wood or kick back.

What's happening?
You noticeLikely causeStart at
Gap between the square and the board endThe factory end isn't squareStep 1
New piece is too short or longMeasured from the wrong spot or misread the tapeStep 2
Line looks crooked or wideLip not tight, or a dull pencilStep 3
Board shifts, sags or pinches the bladeNot clamped or supported rightStep 4
Piece came out about 1/8 inch shortThe kerf was on the wrong side of the lineStep 5
Cut end has a slight gap or fuzzy edgesTrim and sandStep 6
Wear eye protection, clamp the board and unplug the saw before touching the bladeWear safety glasses for every cut, and hearing protection with a circular saw. Clamp the board to sawhorses or a bench so both your hands are free and the board can't move. Never cut a board held in your hand or across your leg. Keep the cord behind you and away from the blade path. Unplug the saw, or remove the battery, before changing the blade or adjusting depth. Let the blade stop fully before you lift the saw. If you're cutting old painted wood from a pre-1978 home, test the paint for lead before you cut or sand it.

Let's fix it

0 of 6 done
  1. Check that the factory end is squareLumber ends from the store are often a little off, and some are split or crushed. Set the board flat on a table or sawhorses. Hook the lip of the speed square tight against the long edge, near the end. Slide it until its straight side touches the end of the board. If there's no gap, that end is square and you can measure from it. If you see a gap, or the end is split, plan to trim about 1/2 inch off first, using the same marking and cutting steps below. A clean, square starting end is what makes the finished piece square.
    Something went wrong?
    • The square rocks on the board The board may be cupped or the edge may have a bump. Hold the lip on the flattest part of the edge and press the square flat.
    Top view of a board end with a speed square's lip hooked on the long edge, showing a red wedge-shaped gap between the square and an angled factory end that needs trimming
  2. Measure the length you needMeasure the space the board has to fit, not the old board, if the old one was broken or cut short. For a shelf, measure the back, middle and front of the opening, and use the shortest number. Subtract about 1/16 inch so it slides in without forcing. Hook the end of the tape on the square end of the board and pull it tight along one edge. At your number, draw a small V with the point exactly on the mark. A V shows the spot better than a dash. Measure again from the end before you cut.
    Something went wrong?
    • The tape hook wobbles That small play is on purpose, so the tape reads right both hooked and pushed. Pull it snug and read it the same way each time.
    Tape measure hooked over the square end of a board and pulled along one edge, with a pencil drawing a small V-shaped mark at the measured length
  3. Hook the lip and draw the lineLay the speed square flat on the board with its thick lip, also called the fence, hooked over the near edge. Slide it along the edge until its straight side lines up with the point of your V. Press the lip firmly against the edge with one hand. If the lip lifts off the edge even a little, the line won't be square. With a sharp pencil, draw along the straight side from the near edge toward the far edge. A 7-inch square covers a board up to about 7 inches wide. For a wider board, draw as far as you can, then flip the square to the far edge and finish the line. Last, draw a big X on the side you'll throw away.
    Something went wrong?
    • The line is fuzzy or wide Sharpen the pencil or use a fine mechanical pencil.
    Speed square with its lip hooked on the board edge and a pencil drawing a straight line along its side, with an X marked on the waste side and the keep side labeled
  4. Set up the saw and the board safelyPut on safety glasses, and hearing protection for a circular saw. Lay the board across sawhorses or a sturdy bench, with your line just past the support so the waste piece can fall away. Clamp the keep side down. Don't hold the board in your hand or across your knee. With the saw unplugged, set the blade depth so less than one full tooth shows below the board. That's the setting saw makers such as Bosch recommend, and it reduces kickback. Run the cord behind you, well clear of the cut path. Unplug the saw before changing or touching the blade.
    Something went wrong?
    • Both ends of the board are supported close to the cut The board can sag and pinch the blade. Move a support so the waste side hangs free, or support the board along its length with the cut between supports on a scrap sheet.
    • You can't clamp it Use a handsaw instead, with the board held on a bench by your knee or a clamp, not your lap.
    Board clamped to two sawhorses with the waste end overhanging past the cut line, plus an inset showing the circular saw blade set so less than one tooth sticks out below the board, and safety glasses
  5. Cut on the waste side of the lineThe blade removes a strip of wood about 1/8 inch wide, called the kerf. Keep the whole kerf on the X side, so the pencil line stays on your piece. With a circular saw, set the speed square on the keep side with its lip hooked on the near edge. Rest the saw's flat base, the shoe, against the square's straight side and slide both until the blade lines up just beside your line. Hold the square firmly. Start the saw before the blade touches the wood, let it reach full speed, and push it steadily through. With a handsaw, start with a few light pull strokes at the far corner, then saw with long, easy strokes. Hold the waste end near the finish so it doesn't snap off.
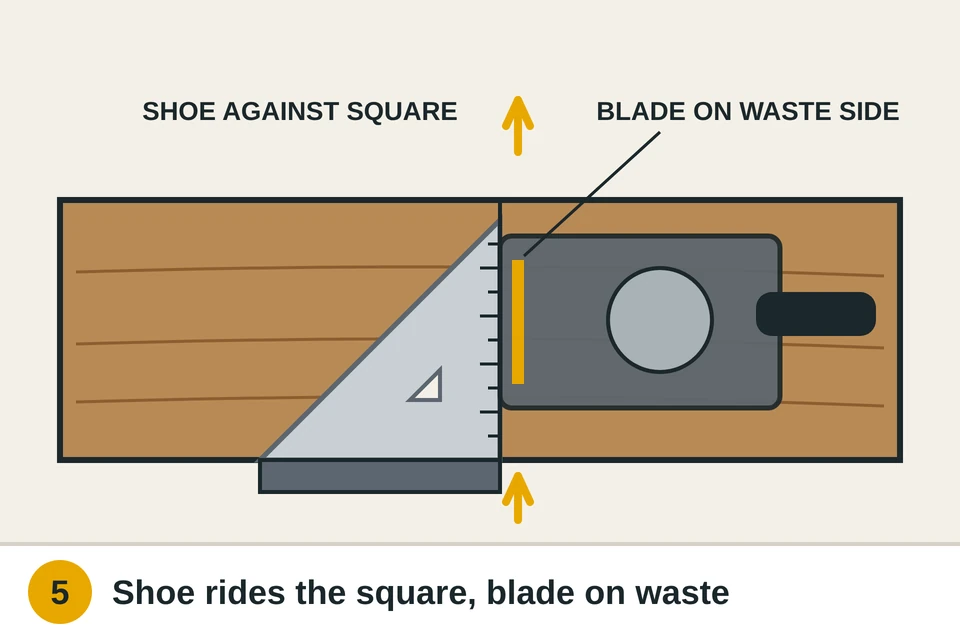
    Something went wrong?
    • The saw drifts away from the square You may be pushing the saw sideways. Keep light pressure toward the square and let the blade do the work.
    • The blade binds or the saw jumps back Let go of the trigger and wait for the blade to stop. Check that the waste side can fall freely and that the blade isn't dull.
    Top view of a circular saw with its base plate pressed against a speed square hooked on the board edge, with the blade lined up just on the waste side of the pencil line and arrows showing the saw pushed through
  6. Check the cut, then sand the edgesHook the speed square on the long edge again and hold its straight side to the new end. There should be no light between them on either face. Then set the piece in place. A shelf should drop onto its supports with only light pressure. If the cut is slightly out of square or a hair long, mark a new line about 1/16 inch back and trim again. Sand off the fuzzy edges, called tear-out, with 120-grit sandpaper on a block. If your home was built before 1978 and you're cutting old painted trim, test the paint for lead first, and don't sand it if it's positive.
    Freshly cut board end with a speed square held against it showing no gap and a green check, and a sanding block moving back and forth along the edge

Watch it done

How to Make Straight Cuts with a Circular Saw and Rafter SquareBy Pro Tool Reviews on YouTube. Their method may vary a little from ours.
Watch on YouTube
How you'll know it's fixed
  • The speed square shows no gap against the new end, on both faces
  • The piece measures the length you marked, give or take 1/16 inch
  • It fits its spot with light pressure, not a hammer
  • The cut edges are smooth, with no splinters

Still a gap or a wobble at the end? See what to check next.

If the cut still comes out wrong

If every cut comes out slightly angled even with the square tight, the saw blade may not be at 90 degrees to its base. Unplug the saw, set the bevel to zero, and hold the speed square between the base and the blade body, not the teeth. Adjust the bevel stop until there's no gap, as the saw's manual shows.

If the piece is square but a shelf still won't sit flat, the opening may not be square. Measure both diagonals of the opening; if they differ, cut to the shorter side and shim the gap. For trim, small gaps can be hidden with filler, as in our guide to filling nail holes in trim. A long splice in baseboard is a different joint, covered in replacing a damaged baseboard section.

If the board itself is warped, twisted or bowed, a square cut won't make it fit. Pick a straighter board, or cut a shorter piece from the flattest part. When you fasten the new board, our toenailing guide shows how to nail at an angle where you can't reach the end, and the hammer basics guide covers setting nails without dents.

Cut the longest pieces firstCut the longest piece from a board first. After a mistake, the piece can still become one of the shorter parts, so you waste less wood.
Renting?In a rental, cutting your own shelves and boards to length is usually fine, since you're not changing the home. Ask before cutting or replacing built-in shelving, trim or deck boards, and report broken or loose deck boards to your landlord.
Call a handyman or carpenter ifYou don't have a safe place to clamp and cut, or the job needs many precise cuts, like a full set of shelves or a stair tread. Stop and call if a deck board is soft or rotten underneath, if a railing or stair is loose, or if the board is part of the home's structure.Fix it yourself or call? Compare the cost →

What a pro typically charges (a rough estimate; prices vary by area): A handyman typically charges about $75–$150 for a small job like cutting and fitting a shelf or one board, often as a one-hour minimum. Lumber is extra.

Find a handyman near you

Something else going on?

Speed square cutting questions

How do you use a speed square to cut a straight line?

Hook the lip on the board's edge, slide the square to your mark and draw along the straight side. To guide a circular saw, hold the square there and run the saw's base along it.

Which side of the line do you cut on?

Cut on the waste side, the side you marked with an X. The blade removes about 1/8 inch, and keeping it off your piece keeps the piece full length.

Do I need to trim the end of a new board?

Check it first. Hook the square on the edge and hold it to the end. If you see a gap, or the end is split or dented, trim about 1/2 inch off.

What size speed square should I buy?

A 7-inch speed square fits a tool belt and handles boards up to about a 2x8. A 12-inch square covers wider boards, up to about a 2x12.

Can I cut a board square with a handsaw?

Yes. Mark the line the same way, clamp the board and saw on the waste side with long, easy strokes. Check the end with the square and trim if needed.

Reader reports

Did this fix work for you?

Tell the next person how it went. Your numbers are added to the totals anonymously; tips are read by our team before they appear.

How did it go?
Reader Q&A

Questions from readers

No questions on this guide yet. If you're stuck, ask below. Useful questions and answers get added here for the next person.

Ask a question

We read every question before anything is published, and we never show names or emails. Please leave out personal details. PrivacyAccessibility

About the authors

GrabTheHammer Team

  • No sponsored picks
  • Safety first
  • Tells you when to call a pro

We're a small team of writers and editors who check every guide against manufacturer instructions and common code requirements. Our goal is to help you understand the problem, tackle what you safely can and know when to call a pro.

Checked against: This Old House, How to use a speed square (lip against the edge, guide for the saw base); Pro Tool Reviews, How to make straight cuts with a circular saw and speed square (7-inch square up to 2x8, 12-inch up to 2x12, start the saw before it touches); Bosch circular saw safety rules (less than a full tooth below the workpiece, clamp the work, never hold it in your hand or across your leg) and JLC on unplugging before changing the blade.

How we write and review →
A helpful next stepReplace a cracked or loose deck boardFit and fasten a new deck board once it's cut.