Replace a damaged section of baseboard
A short stretch of ruined baseboard doesn't mean the whole wall has to come off. Water-swollen MDF, pet chew marks and deep gouges are common, and you can usually cut out just the bad part. The new piece joins the old trim with angled scarf joints over the studs, so the seams are easy to hide. First check whether a little wood filler would do, and whether water is still getting in.


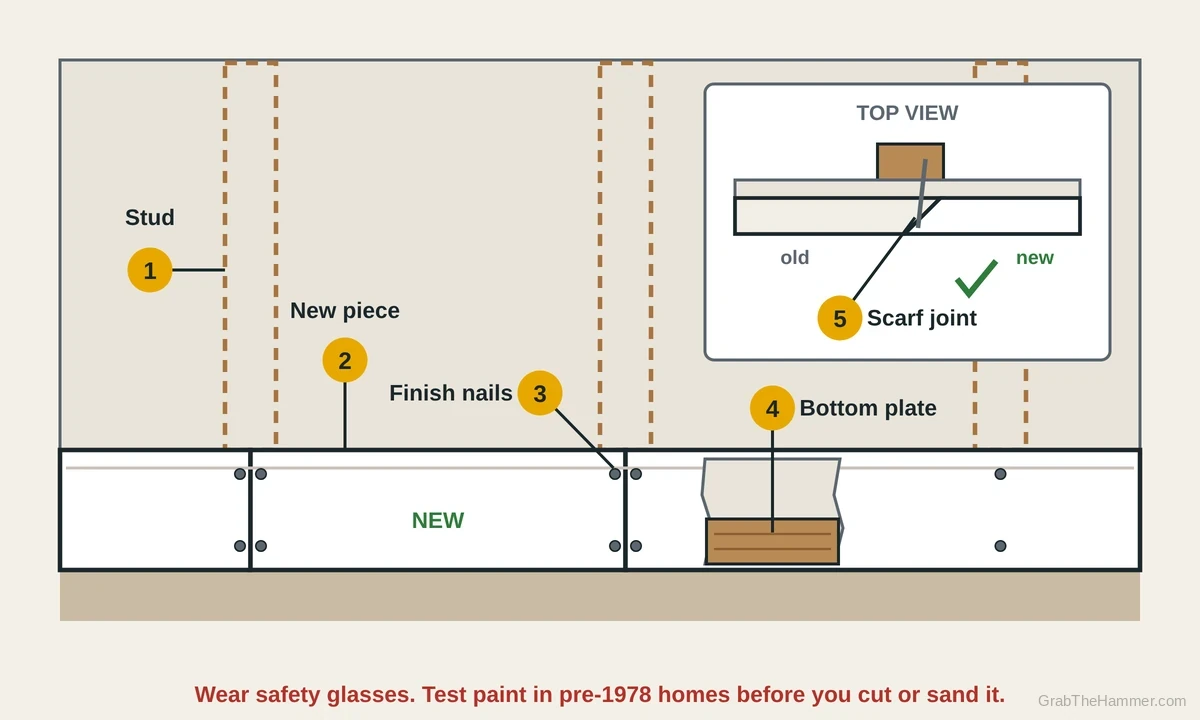
How baseboard is attached, and why a scarf joint
Baseboard is held to the wall with thin finish nails. They go through the drywall into the studs, the upright framing boards behind the wall, and into the bottom plate, the flat board the studs stand on. A bead of caulk and a few coats of paint seal the top edge to the wall. For a long run of trim, the caulk calculator shows how many tubes to buy. Much modern baseboard is MDF, a board made of wood fibers and glue. MDF holds paint well and stays straight, but it swells when water soaks into it. Once it puffs up or crumbles, sanding often won't bring it back flat, so cutting out the swollen part is usually the cleaner fix.
When you splice a new piece into old trim, the joint matters. A square butt joint can open into a visible gap if the wood shrinks. This Old House recommends a scarf joint instead: both ends are cut at 45 degrees so they overlap, then glued and nailed. If the trim moves a little, the overlap still looks closed. Putting each joint over a stud gives the nails something solid to grab on both sides of the seam.
What usually ruins a section of baseboard
MDF wicks water up from the bottom edge and swells.
Repeated soaking slowly puffs the bottom edge.
Dogs and some cats gnaw the corners and low edges.
Deep gouges and crushed corners from impacts.
Damp drywall behind the trim keeps it wet.
| You notice | Likely cause | Start at |
|---|---|---|
| Not sure if it needs replacing | Check the damage, the water and the wall | Step 1 |
| Damage is deep, swollen or crumbly | Score the caulk and find the nails | Step 2 |
| Board runs past the damage | Cut it at the studs and pry it free | Step 3 |
| Need trim that matches | Match the profile, cut 45-degree ends | Step 4 |
| New piece is cut | Glue, nail and set the heads | Step 5 |
| Small dents, nail holes or seams | Fill, sand, caulk, prime and paint | Step 6 |
Let's fix it
- Decide: fill it or replace itLook closely at the damage in good light. Shallow dents, small chew marks and nail holes in solid wood can usually be filled with wood filler. Press the trim with your thumb. If MDF is puffed up, soft or flaking at the bottom edge, filling won't last, so plan to replace that part. Next, find out why it got wet. Check for a drip under a sink, a leaking dishwasher or a wet floor nearby, and fix that first. Then look and smell at the wall just above the trim. If the drywall feels soft, crumbles or shows black or green spots, stop. Our guide to a leak under the sink can help find the water. If the damage is small and dry, skip to Step 6.

- Score the caulk line and find the nailsIf the paint may be from before 1978, test it first; scoring and prying can make lead dust. Run a sharp utility knife along the top edge where the trim meets the wall. Make two light passes through the caulk and paint rather than one hard one. Do the same along any seam at the floor or shoe molding. This cut keeps the drywall paper from tearing when the trim comes off. Next, find the nails. Look for small filled dimples in the trim, or use a stud finder. Studs are usually about 16 inches apart. Mark each stud on the wall above the trim with painter's tape. You'll cut the old trim at the studs on each side of the damage. Our guide to finding a wall stud has more tricks.

- Cut at the studs and pry the section freePut on safety glasses. If the damaged board is short and ends at a corner, you can pry the whole board off and cut it on a bench. For a long board, cut it in place. Hold an oscillating tool with a wood blade at the center of a marked stud. Tilt the blade to about 45 degrees if you can, so the old end gets a scarf. Cut slowly, and stop before the blade hits the floor. Then slide a wide putty knife behind the trim near a nail. Put a flat pry bar in front of the knife, or over a scrap block, never against bare drywall. Lever gently and work from nail to nail. Our guide to removing baseboard without damage shows this in detail.

- Match the profile and cut the new pieceTake the damaged piece to a home center or lumberyard. Match the height, the thickness and the shape of the top edge by holding them side by side. Trim is often sold in 8 foot and longer lengths. If you can't find an exact match, a lumberyard may be able to mill one, or you can replace the whole wall's run for a cleaner look. Measure the gap along the bottom edge, from the long point of each old cut. Set a miter box to 45 degrees. Cut one end so it overlaps the old end on the stud, then dry fit it. Cut the other end a little long, test, and trim until it slips in snugly. Paint or prime the new piece first if you like; it saves touch-up later.

- Glue the scarf joints and nail it inSpread a thin bead of wood glue on both angled ends. Press the new piece against the wall and down to the floor. Put on safety glasses. At each stud, drive two finish nails, typically 1 1/2 to 2 inches long. Put one near the top into the stud, and one near the bottom angled slightly down into the bottom plate. Don't nail into the floor itself. At each joint, angle one nail through the overlap so it pins both pieces. Use a claw hammer and short, controlled taps. Stop when the head is about 1/8 inch proud, so the hammer face never hits the trim. Then finish with a nail set, sinking each head about 1/16 inch below the surface. Wipe off squeezed-out glue with a damp rag right away.

- Fill, sand, caulk, prime and paintOnce the glue dries, press wood filler into the nail holes and the joint lines with a putty knife. Overfill slightly, since filler often shrinks a little. When it's dry, sand lightly with fine sandpaper, about 180 to 220 grit, just until it's flush. Wear a dust mask, and don't sand old paint that might contain lead. Prime the raw filler and any bare MDF, especially cut edges, which soak up paint. Run a thin bead of paintable caulk along the top edge where the trim meets the wall. Smooth it with a damp finger. Paint after the caulk is dry to the touch, or as the label says. Two thin coats usually hide a scarf joint well. Our guide to filling nail holes in trim covers the details.

Watch it done
- The new piece sits tight to the wall and floor and doesn't move when pressed
- You can't feel a ridge when you run a finger across the joints
- Nail heads are below the surface and filled
- The top edge is caulked and the paint matches from a few feet away
Seam showing again? Fill it again lightly, then prime and repaint; a little shrinkage is normal.
If it comes back
If the new trim swells too, water is still getting to it. Check under nearby sinks and appliances; our guides to a leak under the sink and a dishwasher leaking water walk through the usual spots.
If the joint opens into a crack, the nails may have missed a stud. Renail into the stud and plate, as in reattaching loose baseboard, then refill. Our hammer guide covers setting nails without denting the trim.
If there's a gap along the floor after the repair, the floor may dip. Adding quarter round along the floor covers it and hides the bottom of the joint too.
What a pro typically charges (a rough estimate; prices vary by area): A handyman typically charges about $100–$300 to replace a short section of baseboard and paint it. Mold or drywall repair costs more.
Find a handyman near you